NestJS, TypeORM, Angular 이해하기
Table of Content
1. Client Side Rendering이란?
Client-Side Rendering
•
클라이언트 사이드 렌더링(CSR)은 웹 페이지의 콘텐츠를 서버에서 전달하는 대신, 웹 브라우저(클라이언트)에서 직접 렌더링하는 방식
•
웹 페이지의 콘텐츠를 서버에서 HTML을 완전히 구성하지 않고, JavaScript를 통해 웹 브라우저(클라이언트)에서 콘텐츠를 동적으로 렌더링하는 방식
•
프론트엔드 서버는 주로 JavaScript, CSS, HTML의 기본 템플릿을 전달하고, 브라우저에서 JavaScript가 데이터를 가져와 화면을 구성
•
Angular와 같은 프론트엔드 애플리케이션을 별도의 Express 웹서버에서 호스팅하는 것은 관례적인 패턴이고 nginx 등 다양한 웹서버를 고려 할 수 있다.
◦
Express는 정적 파일(빌드된 HTML, JS, CSS)을 클라이언트에 서빙하는 역할
•
ng serve 명령어는 개발 환경에서 사용
◦
실제 배포 시에는 빌드된 정적 파일들을 별도의 서버(예: Express 서버 또는 CDN)에서 서빙
•
실제로 배포된 상태에서는 독립된 서버(정적 서버 또는 백엔드 서버)에서 정적 파일을 클라이언트로 전송하는 방식이 사용
Server-Side Rendering은?
•
서버 사이드 렌더링(SSR)은 서버에서 페이지를 미리 렌더링하여 완전한 HTML 파일을 클라이언트에 전달하는 방식
•
서버는 요청을 받을 때마다 필요한 데이터를 조회하고, 템플릿 엔진(예: EJS, Handlebars, Pug)을 통해 HTML을 생성하여 클라이언트로 응답
•
SSR은 백엔드에서 뷰 템플릿 엔진을 사용하는 경우
•
프론트엔드 프레임워크(예: Next.js, Nuxt.js, Angular) 등에서도 서버에서 HTML을 생성하여 전송하는 방식을 포함
•
프론트엔드 정적 페이지를 백엔드 서버에서 정적 파일로 서빙하는 것은 SSR과 구별되며. 정적 파일 서빙은 정적 콘텐츠를 클라이언트로 단순히 전달하는 것이며, 렌더링 과정이 서버에서 실시간으로 이루어지는 SSR과는 다른 개념
•
프론트엔드 프레임워크를 사용하면서 프론트엔드 정적페이지를 백엔드 서버에서 정적파일로딩에 올리는 경우에도 서버사이드 렌더링으로 포함(백엔드 실행 시 포함된 프론트엔드 빌드 파일 자동 실행인 경우)
Client-Side Rendering을 사용하는 이유?
•
CSR은 웹 페이지의 부분적인 업데이트와 동적 렌더링을 지원
◦
이는 jQuery를 통해 웹 페이지의 동적 렌더링을 경험해본 경우(타이핑에 검색어 자동 추적 등) 사용자 경험이 대폭 상승 하는 것을 알 수 있음
•
빠른 페이지 전환
◦
클라이언트에서 필요한 데이터만 서버로부터 가져와 화면을 업데이트
•
CSR은 서버에서 렌더링을 하지 않기 때문에 서버의 부하를 줄이고, 서버의 스케일링을 더 유연하게 관리
•
프론트엔드 개발의 유연성
◦
백엔드, 프론트엔드 파트별 개발의 독립성을 가질 수 있음
◦
프론트엔드 애플리케이션에서 복잡한 비즈니스 로직을 구현하는데 집중 할 수 있음
2. IONIC, Angular 환경 구축해보기
IONIC이란?
•
Ionic은 하이브리드 모바일 애플리케이션을 개발하기 위한 CSS 프레임워크
•
하나의 코드베이스로 iOS, Android, 웹 애플리케이션을 동시에 개발
•
Angular 기반으로 다양한 Angular의 구조를 그대로 활용할 수 있다.
•
모바일 애플리케이션에서 일반적으로 필요한 다양한 UI 컴포넌트(버튼, 카드, 모달 등)를 제공
IONIC 프레임워크 설치
•
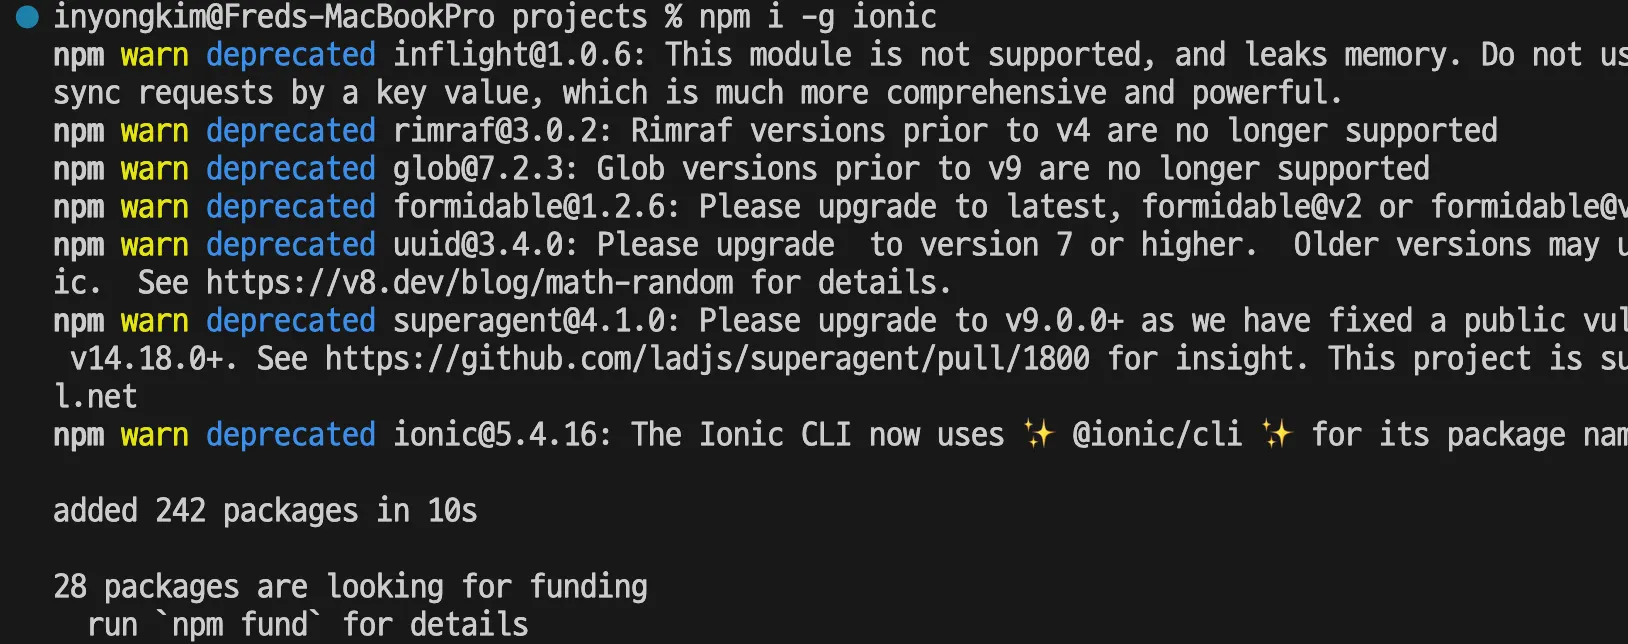
Ionic CLI가 Angular를 기반으로 프로젝트를 생성하는 경우, Angular 관련 패키지들도 자동으로 설치한다.
npm install -g @ionic/cli
Shell
복사
ionic start
Shell
복사
→ Start with wizard : N
→ Framework : Angular
→ Project nam : board-app-front
→ Starter template : blank
→ Build app with : NgModules
IONIC 프로젝트 개발모드 실행
•
Ionic 프로젝트를 실행하는 것은 다음 명령어를 통해서 개발 모드 실행이 가능하다.
ionic serve
Shell
복사
•
하지만 기본적으로 Ionic 프레임워크는 Angular의 구조를 기반으로 하고 있다. 따라서 Angular 프로젝트 실행과 동일한 명령어를 사용 할 수도 있다.
ng serve
Shell
복사
•
Ionic 자체는 모바일 버전의 최적화에 집중되어 있으므로 실제로
◦
ionic serve는 Ionic의 모바일 친화적인 UI 컴포넌트와 스타일을 적용하여 렌더링하므로 모바일 버전만을 고려하고 있다면 해당 개발 명령어를 사용하는 것이 바람직하다.
3. Angular(IONIC) 프로젝트의 구조
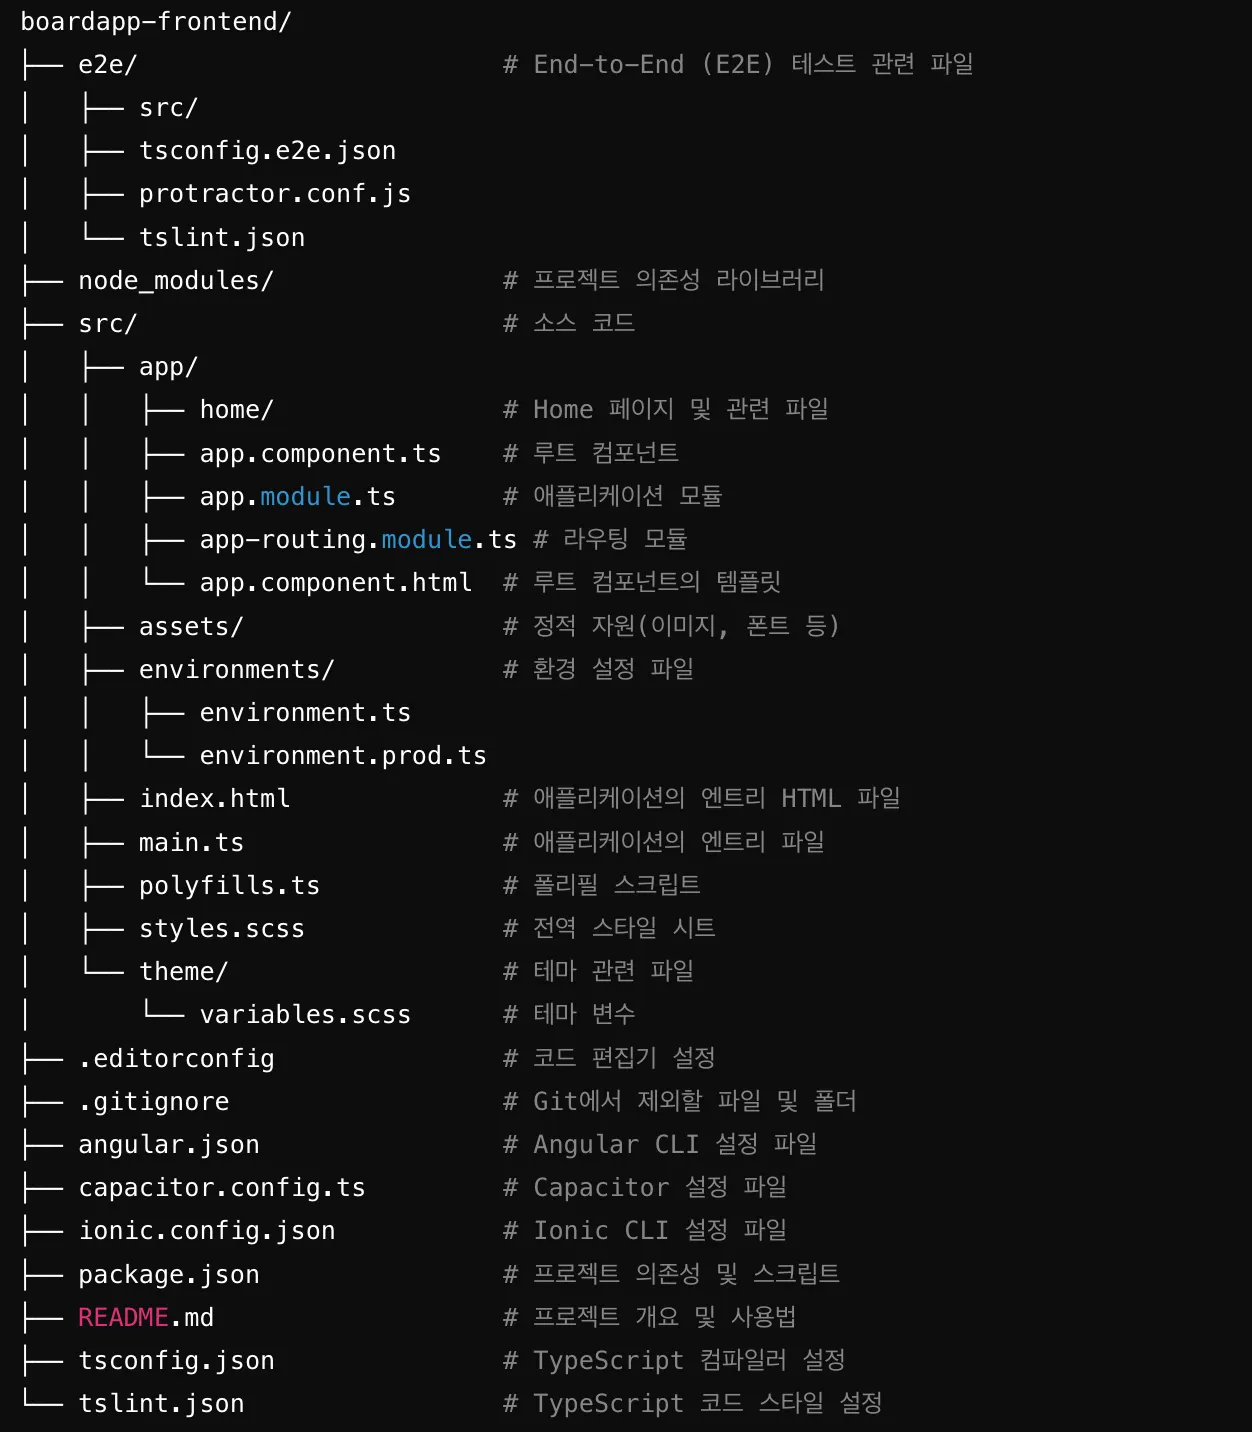
IONIC 프로젝트 생성 시 기본 폴더 및 파일의 설명
•
최초 프로젝트 생성 시 다음과 같은 폴더 구조를 가지고 있다.
실제 개발에서 사용되는 주요 소스코드 경로
1.
src/app/ 


•
app.module.ts
◦
애플리케이션의 루트 모듈 파일 - (이는 NestJS와 동일한 DI Container로 이해)
◦
애플리케이션의 전역적인 의존성 및 설정을 관리
•
app.component.ts
◦
애플리케이션의 루트 컴포넌트
◦
애플리케이션의 주요 레이아웃을 정의하고, 애플리케이션의 전역 상태를 관리
•
app-routing.module.ts
◦
애플리케이션의 라우팅 모듈
◦
애플리케이션의 페이지와 컴포넌트 간의 네비게이션을 설정 (하이퍼링크와 유사)
2.
src/app/pages/ 


•
각 페이지 폴더
◦
각 페이지(또는 컴포넌트) 별로 구성된 폴더
◦
각 페이지의 HTML, CSS(SCSS), TypeScript 파일이 포함.
▪
예를 들어, home/, articles/ 등의 폴더가 계속해서 생성,
3.
src/assets/
•
정적 자원
◦
이미지, 폰트, JSON 파일 등 애플리케이션에서 사용하는 정적 자원을 저장하는 폴더
◦
애플리케이션에서 공통적으로 사용하는 자원을 관리
•
기타
1.
src/environments/
•
환경 설정 파일
◦
개발 환경(environment.ts)과 프로덕션 환경(environment.prod.ts)의 설정을 분리하여 관리
◦
환경별로 API 엔드포인트나 기타 설정을 다르게 할 때 사용
2.
src/styles.scss
•
전역 스타일 시트
◦
애플리케이션의 전역 스타일을 정의
◦
공통적으로 사용되는 스타일을 여기에 정의하여 일관된 디자인을 유지하는 목적
3.
src/theme/
•
테마 관련 파일
◦
variables.scss와 같은 파일이 포함되어 있으며, 애플리케이션의 테마와 스타일 변수를 정의
◦
디자인 시스템을 유지하거나 커스터마이징할 때 사용
4.
angular.json
•
Angular CLI 설정 파일: 빌드 및 테스트 관련 설정을 정의
◦
빌드 출력 경로, 빌드 옵션, 테스트 설정 등을 관리
5.
capacitor.config.ts
•
Capacitor 설정 파일
◦
Capacitor 플러그인 및 플랫폼별 설정을 정의
◦
네이티브 기능을 사용하는 데 필요한 설정을 관리
6.
package.json
•
프로젝트 의존성 및 스크립트
◦
프로젝트의 의존성과 스크립트 명령어를 정의
◦
패키지 설치, 빌드, 테스트 등 다양한 스크립트를 관리
새로운 리소스 생성하기
ionic generate
Shell
복사
CLI에서 page 모듈을 articles 이름으로 생성
4. API 서버와의 연결 흐름
4.1 API 명세서를 파악하는 눈을 키우기
프론트엔드 입장에서는 API 서버(백엔드 서버)가 어떤 URL 엔드포인트에서 어떤 형태의 응답을 보내는지 부터 확인해야 한다.
•
API 명세서를 기본 근거로 백엔드 개발자는 API 서버를, 프론트엔드 개발자는 요청 서비스와 페이지를 개발하게 된다.
•
기본적인 전체 게시글 조회, 특정 게시글 상세 조회라는 기능을 예시로 보려고 한다.
◦
백엔드의 API 서버가 개발된 현재 상태에서
◦
프론트엔드 개발자가 우선 확인해야 할 것
▪
API의 엔드포인트
▪
API의 응답 데이터 형태
기능 | 엔드포인트(URL) | 요청(Request) | 응답(Response) |
전체 게시글 조회 | localhost:3000/api/articles | - | {
"success": true,
"statusCode": 200,
"message": "All articles retrieved successfully",
"data": [
{
"id": 1,
"author": "김회원",
"title": "Article Title1",
"contents": "those are contents",
"status": "PUBLIC",
"createdAt": "2024-09-04T08:13:48.220Z",
"updatedAt": "2024-09-04T08:13:48.238Z",
"user": {
"id": 2,
"username": "김회원",
"email": "user3@citefred.com",
"role": "USER",
"createdAt": "2024-09-04T08:14:18.674Z",
"updatedAt": "2024-09-04T08:14:18.692Z",
"postalCode": null,
"address": null,
"detailAddress": null
}
},
…
}
]
} |
특정 게시글 조회(id) | localhost:3000/api/articles/{id} | - | {
"success": true,
"statusCode": 200,
"message": "Article retrieved successfully",
"data": {
"id": 8,
"author": "김회원",
"title": "Article Title1",
"contents": "those are contents",
"status": "PUBLIC",
"createdAt": "2024-09-04T10:02:33.427Z",
"updatedAt": "2024-09-04T10:02:33.427Z",
"user": {
"id": 2,
"username": "김회원",
"email": "user3@citefred.com",
"role": "USER",
"createdAt": "2024-09-04T08:14:18.674Z",
"updatedAt": "2024-09-04T08:14:18.692Z",
"postalCode": null,
"address": null,
"detailAddress": null
}
}
} |
계층적으로 정보를 접근하기
•
우선 전체 게시글 조회 API 하나만 응답(Response)의 형태를 살펴보고자 한다.
•
프론트엔드 개발자도 아래 같은 흐름으로 직관적으로 API 명세서를 파악해야 한다.
◦
localhost:3000/api/articles URL에 요청을 보내면
◦
→ JSON 형태 데이터가 응답
◦
→ 크게 success, statusCode, message, data 라는 키에 값들이 들어온다
▪
→ success에서는 응답 성공여부가 전달
▪
→ statusCode에서는 응답 성공여부에 대한 응답코드가 전달
▪
→ message에서는 성공여부에 대한 메시지
▪
→ data에 실질적인 게시글들이 있음
•
전체 게시글 요청이기 때문에 단일 객체가 아니라 여러개 일 수 있구나(배열)
•
게시글 id, author 등등 기본 게시글의 정보가 담겨 있구나
•
그 중 user라는 부분에는 게시글 작성자의 정보가 담겨 있구나
◦
user에는 게시글 작성자 회원의 id, username 등이 있구나
•
결론, 저 API에서 내가 화면에 뿌려줘야 할 게시글 정보는 data안에 있다.
{
"success": true,
"statusCode": 200,
"message": "All articles retrieved successfully",
"data": [
{
"id": 1,
"author": "김회원",
"title": "Article Title1",
"contents": "those are contents",
"status": "PUBLIC",
"createdAt": "2024-09-04T08:13:48.220Z",
"updatedAt": "2024-09-04T08:13:48.238Z",
"user": {
"id": 2,
"username": "김회원",
"email": "user3@citefred.com",
"role": "USER",
"createdAt": "2024-09-04T08:14:18.674Z",
"updatedAt": "2024-09-04T08:14:18.692Z",
"postalCode": null,
"address": null,
"detailAddress": null
}
},
…
]
}
JSON
복사
4.2 프론트엔드에서의 Model 요청과 처리
우선 프론트엔드는 API 요청을 해야 한다.
•
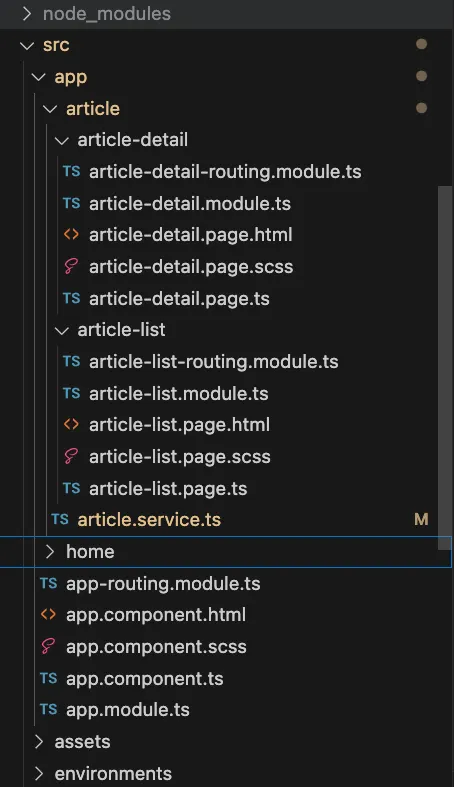
API 서버의 게시글 article 이라는 리소스에 접근하는 프론트엔드 관련 리소스도 article이란 리소스 폴더에 모아서 관리한다.
•
서비스를 통해 데이터를 가져오고, 그 데이터를 템플릿에 바인딩하여 Ionic의 UI 컴포넌트를 사용해 화면에 나타낼 수 있다.
•
article.service.ts 는 게시글과 관련된 요청들을 관리하는 하나의 서비스 계층이라 생각하면 된다.
◦
이곳에서 모든 article과 관련된 API 요청에 대한 메서드를 정의할 예정이다.
▪
ex) 모든 게시글 가져오기, 특정 게시글 가져오기, 검색 등
•
그리고 각 요청 메서드에 대한 응답 데이터(Model)를 내부 리소스 폴더인 article-list, article-detail 등에서 어떻게 페이지에 나타낼 지(응답 데이터를 태그에 뿌려낼지) 세부적으로 조절하게 된다.
4.2.1 기본 JavaScript Fetch()를 통한 요청
첫번째, 서버에서 data라는 부분에 게시글 배열을 반환하는 API가 구성되어 있으므로, 프론트 엔드에서 서비스를 작성하여 데이터를 가져오는 부분ㄴ
article.service.ts
•
getAllArticles() 라는 메서드를 정의
◦
해당 메서드에서는 fetch(URL)을 통해서 URL로 요청하게 되고 응답 데이터를 가져오게 된다.
◦
가장 기본적인 요청 방식이며 fetch API는 네트워크 요청을 보내고, 그 요청이 완료되면 결과를 Promise 객체로 감싸 반환
▪
성공 시 Response 객체 반환
▪
실패 시 reject 상태의 Promise 반환
◦
response.json()을 호출하여 응답 데이터를 JSON 형식으로 변환
▪
이 JSON 데이터는 API의 응답 결과로, ApiResponse 타입에 맞게 변환하여 사용
•
data: 실제 데이터를 담고 있으며, 여기에 Article 또는 Article[]이 포함되는 구조
•
위 ApiResponse까지 변환하는 것은 프로젝트 개발자의 성향에 따라 자유롭게 구성 할 수 있다.
◦
단순하게 데이터만 받아 처리해도 된다는 의미
◦
중요한 것은 fetch를 통해 요청 데이터를 받아오는 방식
import { Injectable } from '@angular/core';
export interface Article {
id: number;
title: string;
contents: string;
// 기타 필요한 필드
}
interface ApiResponse<T> {
success: boolean;
statusCode: number;
message: string;
data: T;
}
@Injectable({
providedIn: 'root'
})
export class ArticleService {
private apiUrl = 'http://localhost:3000/api/articles'; // 실제 API URL로 변경
// 기본 JavaScript의 요청 Fetch를 활용한 방법
async getAllArticles(): Promise<ApiResponse<Article[]>> {
try {
const response = await fetch(`${this.apiUrl}`); // 엔드포인트 localhost:3000/api/articles
if (!response.ok) {
throw new Error('Network response was not ok');
}
const data: ApiResponse<Article[]> = await response.json();
return data; // API 요청 시 Response 데이터(이는 POSTMAN API의 응답 데이터와 같음)
} catch (error) {
console.error('Fetch error:', error);
throw error;
}
}
async getArticleById(id: number): Promise<ApiResponse<Article>> {
try {
const response = await fetch(`${this.apiUrl}/${id}`);
if (!response.ok) {
throw new Error('Network response was not ok');
}
const data: ApiResponse<Article> = await response.json();
return data;
} catch (error) {
console.error('Fetch error:', error);
throw error;
}
}
}
TypeScript
복사
4.2.2 게시글 목록 페이지 구성
두번째, 컴포넌트에서 서비스에 정의된 요청 메서드를 사용해 실제 데이터를 가져오는 부분
우리는 위 Service를 통해 API 데이터 요청 메서드를 정의했다.
•
메서드가 정의되어 있지만 실제로 요청을 실행 한 것은 아니다.
•
이제 각 필요 부분에서 저 요청 메서드를 실행하도록 구성해야 한다.
•
우선 게시글 목록을 만드는 articles/article-list라는 리소스 폴더에서 해당 메서드를 호출하고자 한다.
article-list/article-list.page.ts
•
클래스 선언부 ArticleListPage implements OnInit
◦
해당 클래스는 OnInit 인터페이스를 구현하는 구현체 클래스임을 선언
◦
OnInit() 메서드 정의 할 수 있음
•
ngOnInit()
◦
Angular 컴포넌트의 라이프사이클에서 컴포넌트 초기화 작업을 처리하는 메서드
◦
이는 예로, jQuery의 document.ready() 처럼 초기화 시점에 특정 작업을 수행할 수 있도록 하는 역할과 유사하다고 생각 하면 된다.(물론 Angular 컴포넌트 라이프사이클이 보다 구조적임)
▪
이것을 통해서 해당 페이지에 접근 하면, Service에 정의한 getAllArticles() 메서드가 실행 된다는 의미
▪
실행 결과인 게시글 데이터들은 this.articles = response.data; 에 의해 빈 배열(Article[] = [];)로 초기화되었던 articles라는 변수에 할당되어 저장 됨(사용 준비)
•
생성자 주입 부분
◦
생성자 주입을 통해 Service에 정의한 메서드를 사용하기 위함
◦
Router를 통해 네비게이션 기능을 사용하기 위함(링크 이동)
▪
viewArticle() 이 메서드를 통해 게시글 목록에서 특정 게시글을 조회 할 수 있도록 연결
import { Component, OnInit } from '@angular/core';
import { Router } from '@angular/router'; // Router 추가
import { Article, ArticleService } from '../article.service';
@Component({
selector: 'app-article-list',
templateUrl: './article-list.page.html',
styleUrls: ['./article-list.page.scss'],
})
export class ArticleListPage implements OnInit {
articles: Article[] = [];
constructor(private articleService: ArticleService, private router: Router) {} // Router 주입
async ngOnInit() {
try {
const response = await this.articleService.getAllArticles();
if (response.success) {
this.articles = response.data;
} else {
console.error(response.message);
}
} catch (error) {
console.error('Fetch error:', error);
}
}
viewArticle(id: number) {
// 상세 페이지로 이동 (예: article-detail 페이지로 이동)
this.router.navigate([`detail/${id}`]);
}
}
TypeScript
복사
4.2.3 화면에 표시
가져온 articles 배열을 Ionic의 태그로 화면에 목록으로 표시하는 부분(뿌려주는 부분)
이제 요청 실행 부분이 구성되어 우리는 데이터를 가져올 수 있다.
•
article-list.page.html
◦
articles 배열에 조회된 모든 게시글들이 담겨져있다.
◦
ngFor 디렉티브를 사용해 반복적으로 각 게시글을 렌더링
▪
반복문으로 articles에서 1개 게시글(article)씩 리스트를 만들어낸다.
•
반복문으로 <ion-item> … </ion-item> 태그(리스트)가 게시글의 수 만큼 붙게 된다.
•
(click)="viewArticle(article.id)”를 온클릭 이벤트를 지정해두어 각 게시글(id로 구분) 링크 또한 생성되도록 한다.
•
{{ article.title }}과 {{ article.content }}는 각 게시글의 제목과 내용을 바인딩하여 화면에 표시한다.
◦
<ion-list>와 <ion-item>은 Ionic에서 제공하는 기본 UI 컴포넌트이다. 자동으로 모바일 친화적인 디자인이 적용되며, 필요에 따라 추가적인 스타일링을 할 수 있다.
<ion-header>
<ion-toolbar>
<ion-title>Articles</ion-title>
</ion-toolbar>
</ion-header>
<ion-content>
<ion-list>
<ion-item *ngFor="let article of articles" (click)="viewArticle(article.id)">
<ion-label>
<h2>{{ article.title }}</h2>
<p>{{ article.contents }}</p>
</ion-label>
</ion-item>
</ion-list>
</ion-content>
TypeScript
복사
article-list.page.scss
•
IONIC 기본 스타일과 별도로 추가 필요 시 스타일 추가
ion-item {
cursor: pointer;
}
TypeScript
복사
article-list.module.ts
•
게시글 목록 부분들의 클래스간 의존성 주입을 위한 부분이다.
import { NgModule } from '@angular/core';
import { CommonModule } from '@angular/common';
import { FormsModule } from '@angular/forms';
import { IonicModule } from '@ionic/angular';
import { ArticleListPage } from './article-list.page';
import { ArticleListPageRoutingModule } from './article-list-routing.module';
@NgModule({
imports: [
CommonModule,
FormsModule,
IonicModule,
ArticleListPageRoutingModule
],
declarations: [ArticleListPage]
})
export class ArticleListPageModule {}
TypeScript
복사
app.module.ts
•
위 게시글 조회 모듈은 앱 모듈에 등록되어 주입되어야 한다.
•
전체 애플리케이션에서 계층적 모듈간의 의존성 주입을 위하여 다음처럼 등록되어야 한다.
◦
다음장에 추가되는 ArticleDetailPageModule도 포함되어 있다.
import { NgModule } from '@angular/core';
import { BrowserModule } from '@angular/platform-browser';
import { RouteReuseStrategy, RouterModule } from '@angular/router';
import { IonicModule, IonicRouteStrategy } from '@ionic/angular';
import { AppComponent } from './app.component';
import { AppRoutingModule } from './app-routing.module';
// import { ArticleDetailPageModule } from './article/article-detail/article-detail.module';
import { ArticleListPageModule } from './article/article-list/article-list.module';
import { ArticleDetailPageModule } from './article/article-list/article-detail/article-detail.module';
import { HomePageModule } from './home/home.module';
@NgModule({
declarations: [AppComponent],
imports: [
RouterModule,
BrowserModule,
IonicModule.forRoot(),
AppRoutingModule,
ArticleDetailPageModule,
ArticleListPageModule,
HomePageModule
],
providers: [{ provide: RouteReuseStrategy, useClass: IonicRouteStrategy }],
bootstrap: [AppComponent],
})
export class AppModule {}
TypeScript
복사
4.2.4 리스트 → 상세 페이지 부분 구현
현재 서비스는 게시글 목록에서 하나의 카드를 선택하면 특정 게시글 정보를 확인 할 수 있어야 한다.
•
기능을 계층적으로 살펴보면 다음과 같다.
◦
게시글 목록 조회
▪
특정 게시글의 상세 정보 조회
•
따라서 게시글 상세 조회는 게시글 목록 조회의 하위 기능이라고 판단했다.(이 구조는 서비스에 따라서 다를 수 있다.
•
각 소스 코드 내용은 위 게시글 목록과 동일하지만 상세정보를 조회하는 API에 요청하기 때문에 배열이 아닌 단일 객체라는 점 말고는 전반적인 흐름은 동일하기 때문에 코드 해설은 생략한다.
•
app/articles/article-detail 폴더 생성
◦
article-detail.page.ts
import { Component, OnInit } from '@angular/core';
import { ActivatedRoute } from '@angular/router';
import { ArticleService } from '../article.service';
import { Article } from 'src/app/common/article-response.interface';
@Component({
selector: 'app-article-detail',
templateUrl: './article-detail.page.html',
styleUrls: ['./article-detail.page.scss'],
})
export class ArticleDetailPage implements OnInit {
article: Article | undefined;
constructor(
private activateRoute: ActivatedRoute,
private articleService: ArticleService
) {}
async ngOnInit() {
await this.loadArticle();
}
async loadArticle() {
const id = this.activate.snapshot.paramMap.get('id');
if (id) {
try {
const response = await this.articleService.getArticleById(+id);
this.article = response.data;
} catch (error) {
console.error('Fetch error:', error);
}
} else {
console.error('Article ID is null');
}
}
}
TypeScript
복사
◦
article-detail.page.scss
ion-card {
margin: 10px;
}
TypeScript
복사
◦
article-detail.page.html
<ion-header>
<ion-toolbar>
<ion-title>Article Detail</ion-title>
</ion-toolbar>
</ion-header>
<ion-content>
<ion-card *ngIf="article">
<ion-card-header>
<ion-card-title>{{ article.title }}</ion-card-title>
</ion-card-header>
<ion-card-content>
<p>{{ article.contents }}</p>
</ion-card-content>
</ion-card>
</ion-content>
TypeScript
복사
◦
articles.module.ts
▪
이 모듈 또한 app.module.ts에 등록되야 한다.
import { NgModule } from '@angular/core';
import { CommonModule } from '@angular/common';
import { FormsModule } from '@angular/forms';
import { IonicModule } from '@ionic/angular';
import { ArticlesPageRoutingModule } from './articles-routing.module';
import { ArticlesListPage } from './articles-list/articles-list.page';
import { ArticleDetailPage } from './article-detail/article-detail.page';
@NgModule({
imports: [
ArticlesPageRoutingModule,
CommonModule,
FormsModule,
IonicModule
],
declarations: [
ArticlesListPage,
ArticleDetailPage,
]
})
export class ArticlesModule {}
TypeScript
복사
4.2.5 라우팅 설정과 지연 로딩(Lazy Loading)
위 과정으로 요청메서드 정의, 요청 실행 및 데이터 준비, 데이터 렌더링 부분을 살펴보았다.
•
이제 페이지 로딩의 연결에 대한 라우트 설정이 필요하다.
•
브라우저에서 필요한 URL 계층적 구조는 다음과 같다.
◦
▪
localhost:4200/articles/lists/list → 게시글 목록이 나타나야함
•
localhost:4200/articles/detail/{id} → 1번 게시글의 상세 정보가 나타나야 함
위 계층적 구조를 생각하여 Routes를 정의해야 한다.
•
현재 작성되고 있는 부분은 app/articles/ 리소스 폴더에 대한 부분이다.
•
path : ‘’
◦
이 부분에서는 redirectTo 를 통해서 list라는 경로로 리다이렉션한다.
•
path : ‘list’
◦
클래스를 컴포넌트로 지정하면 article-list.page.ts가 해당 경로에서 적용된다는 의미이다. (게시글 목록 불러오기)
•
◦
여기서는 article-detail.page.ts라는 파일을 추가 할 것이며, ArticleDetailPage 특정 게시글의 내용을 보여주는 것에 대한 클래스가 정의 될 것이다.
import { NgModule } from '@angular/core';
import { Routes, RouterModule } from '@angular/router';
import { ArticlesListPage } from './articles-list/articles-list.page';
import { ArticleDetailPage } from './article-detail/article-detail.page';
const routes: Routes = [
{
path: '',
redirectTo: 'list',
pathMatch: 'full'
},
{
path: 'list',
component: ArticlesListPage
},
{
path: 'detail/:id',
component: ArticleDetailPage
}
];
@NgModule({
imports: [RouterModule.forChild(routes)],
exports: [RouterModule],
})
export class ArticlesPageRoutingModule {}
TypeScript
복사
상위 계층 라우팅에 대한 처리와 자식 계층의 지연로딩 설정
•
루트 폴더에 있는 app-routing.module.ts에서 위 방식과 동일하게 /articles경로에 대한 정의가 되어 있어야 했다.
•
root/app-routing.module.ts
•
◦
이 부분에서는 메인 인덱스를 호출한다.
•
◦
여기서는 위에서 작업했던 ArticleListPageModule 이 정의되는데 자식계층인 (상세정보)에 대한 지연로딩에 대한 설정이 추가 된 것이다.
▪
loadChildren 속성을 사용하면 ArticlesModule 에 지연로딩(Lazy Loading)을 설정 할 수 있다.
•
하위 계층 articles-routing.module.ts 의 현재 구성에 따라 게시글 목록이 기본 ㅠㅔ이지가 된다.
•
하지만 게시글 목록의 자식인 게시글 상세 정보는 요청 시 로딩 된다.
import { NgModule } from '@angular/core';
import { PreloadAllModules, RouterModule, Routes } from '@angular/router';
const routes: Routes = [
{
path: 'home',
loadChildren: () => import('./home/home.module').then( m => m.HomePageModule)
},
{
path: '',
redirectTo: 'home',
pathMatch: 'full'
},
{
path: 'articles',
loadChildren: () => import('./articles/articles.module').then( m => m.ArticlesModule)
},
];
@NgModule({
imports: [
RouterModule.forRoot(routes, { preloadingStrategy: PreloadAllModules })
],
exports: [RouterModule]
})
export class AppRoutingModule { }
TypeScript
복사
•
브라우저를 통한 테스트
◦
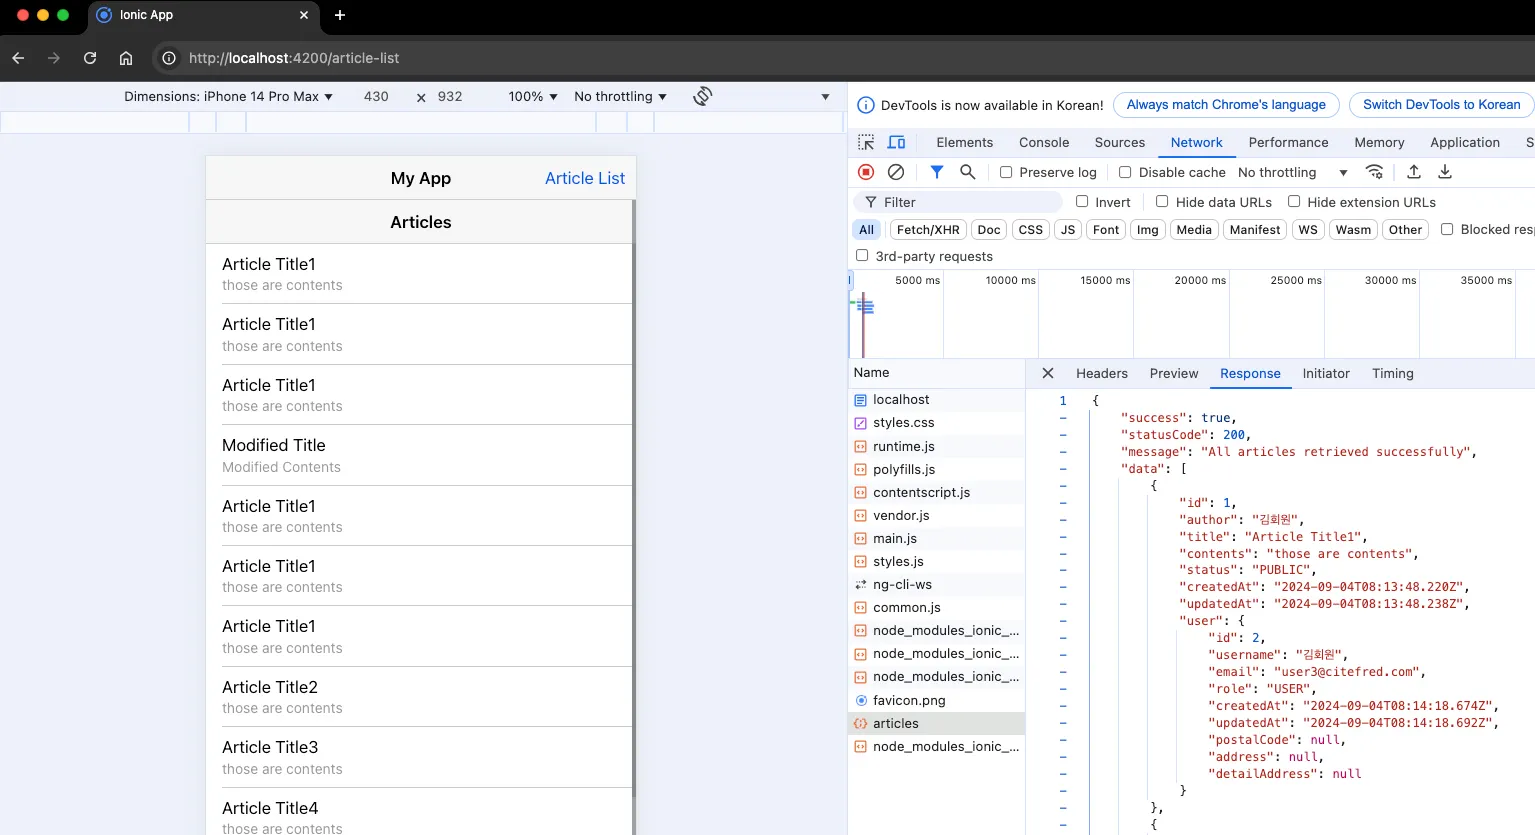
게시글 목록 조회 API 요청에 대한 클라이언트 응답의 렌더링 결과
◦
위 URL 요청 시점에서 실제 API 서버의 요청 쿼리 실행 화면
◦
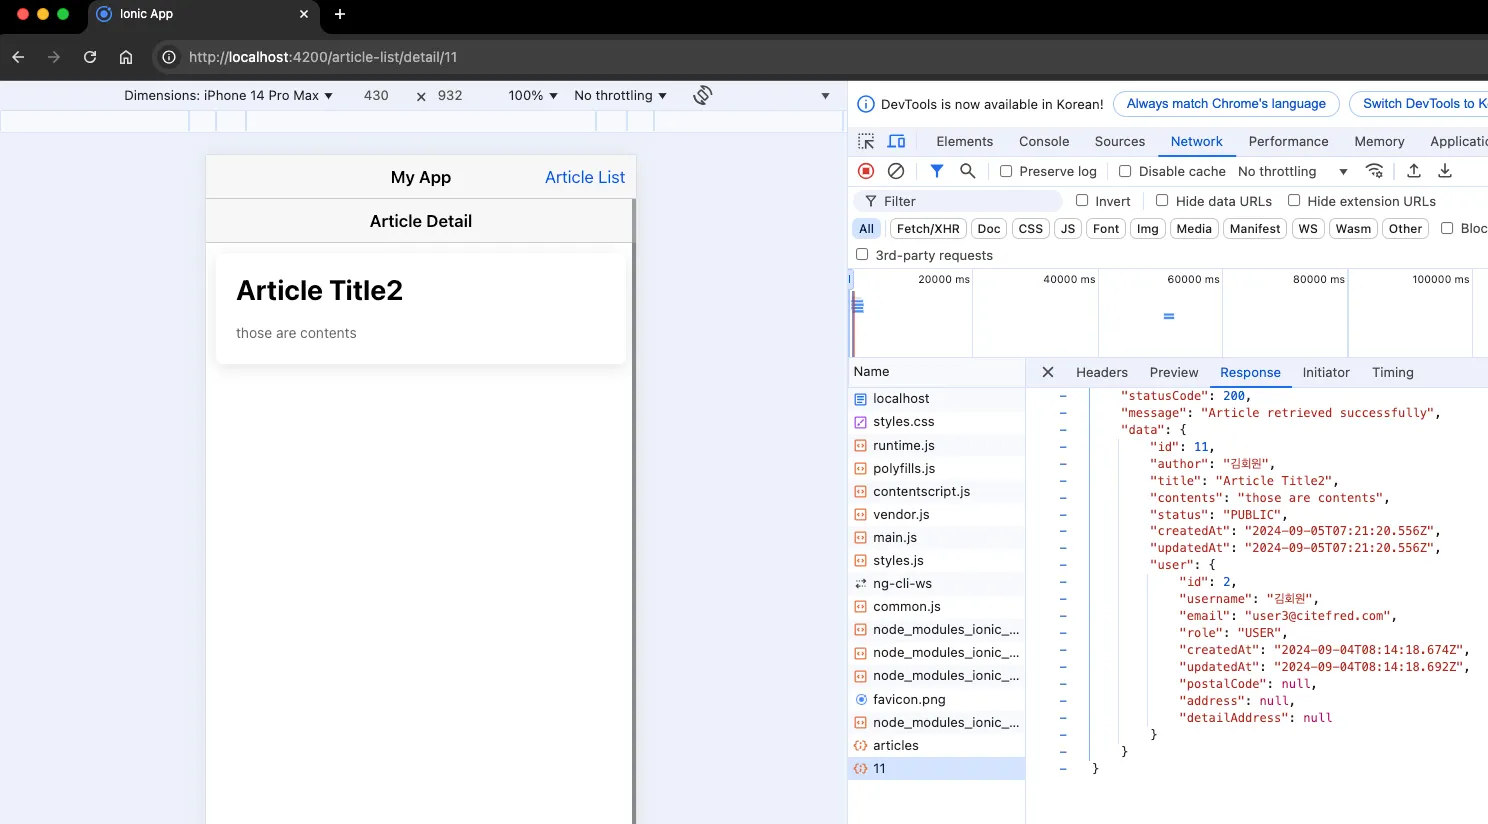
게시글 상세 정보 조회
▪
위 URL 요청 시점에서 실제 API 서버의 요청 쿼리 실행 화면
5. JWT 로그인 상태를 유지한 요청 처리
현재까지 API서버로 요청을 보내고 화면을 구성하는것까지 작동이 되는 것을 확인했다.
•
하지만 백엔드 서버에서는 기본적으로 Guard를 통해 JWT 로그인이 구현된 상태이지만, 해당 요청 흐름의 샘플을 위해서 잠시 비활성화해둔 상태였다.
•
Server의 article.controller.ts 현재 상태
@Controller('api/articles')
// @UseGuards(AuthGuard('jwt'), RolesGuard) // JWT 인증과 role 커스텀 가드를 적용
export class ArticleController {
private readonly logger = new Logger(ArticleController.name); // Logger 인스턴스 생성
// 생성자 주입(DI)
constructor(private articleService: ArticleService){}
// 게시글 작성 기능
...
TypeScript
복사
5.1 기본 기능 프론트엔드 추가
5.2.1 기능 컴포넌트 구조 생성
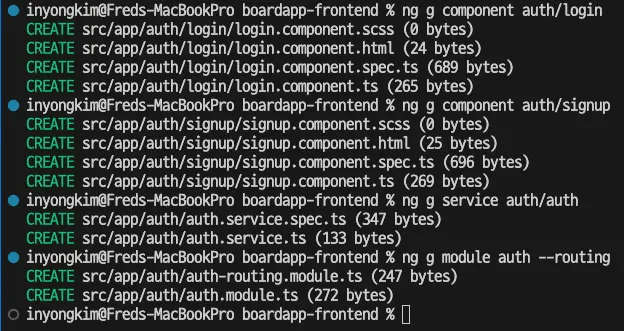
로그인 및 회원가입 페이지 기본 컴포넌트 추가
•
우선 로그인 및 회원가입 페이지를 구성해야 한다.
•
src/auth/ 폴더를 새로 생성하고 아래 처럼 각 컴포넌트를 생성
ng g component auth/signin
Shell
복사
ng g component auth/signup
Shell
복사
ng g service auth/auth
Shell
복사
ng g module auth --routing
Shell
복사
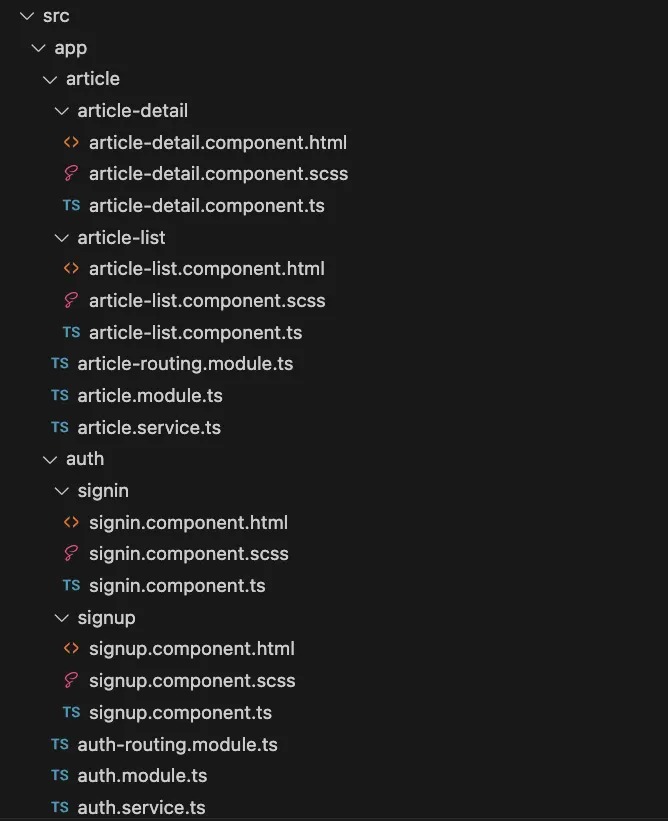
•
폴더 구조는 다음과 같다.
5.1.2 기본 HTML 양식 추가
기본 회원 가입 양식
•
signup.component.html
•
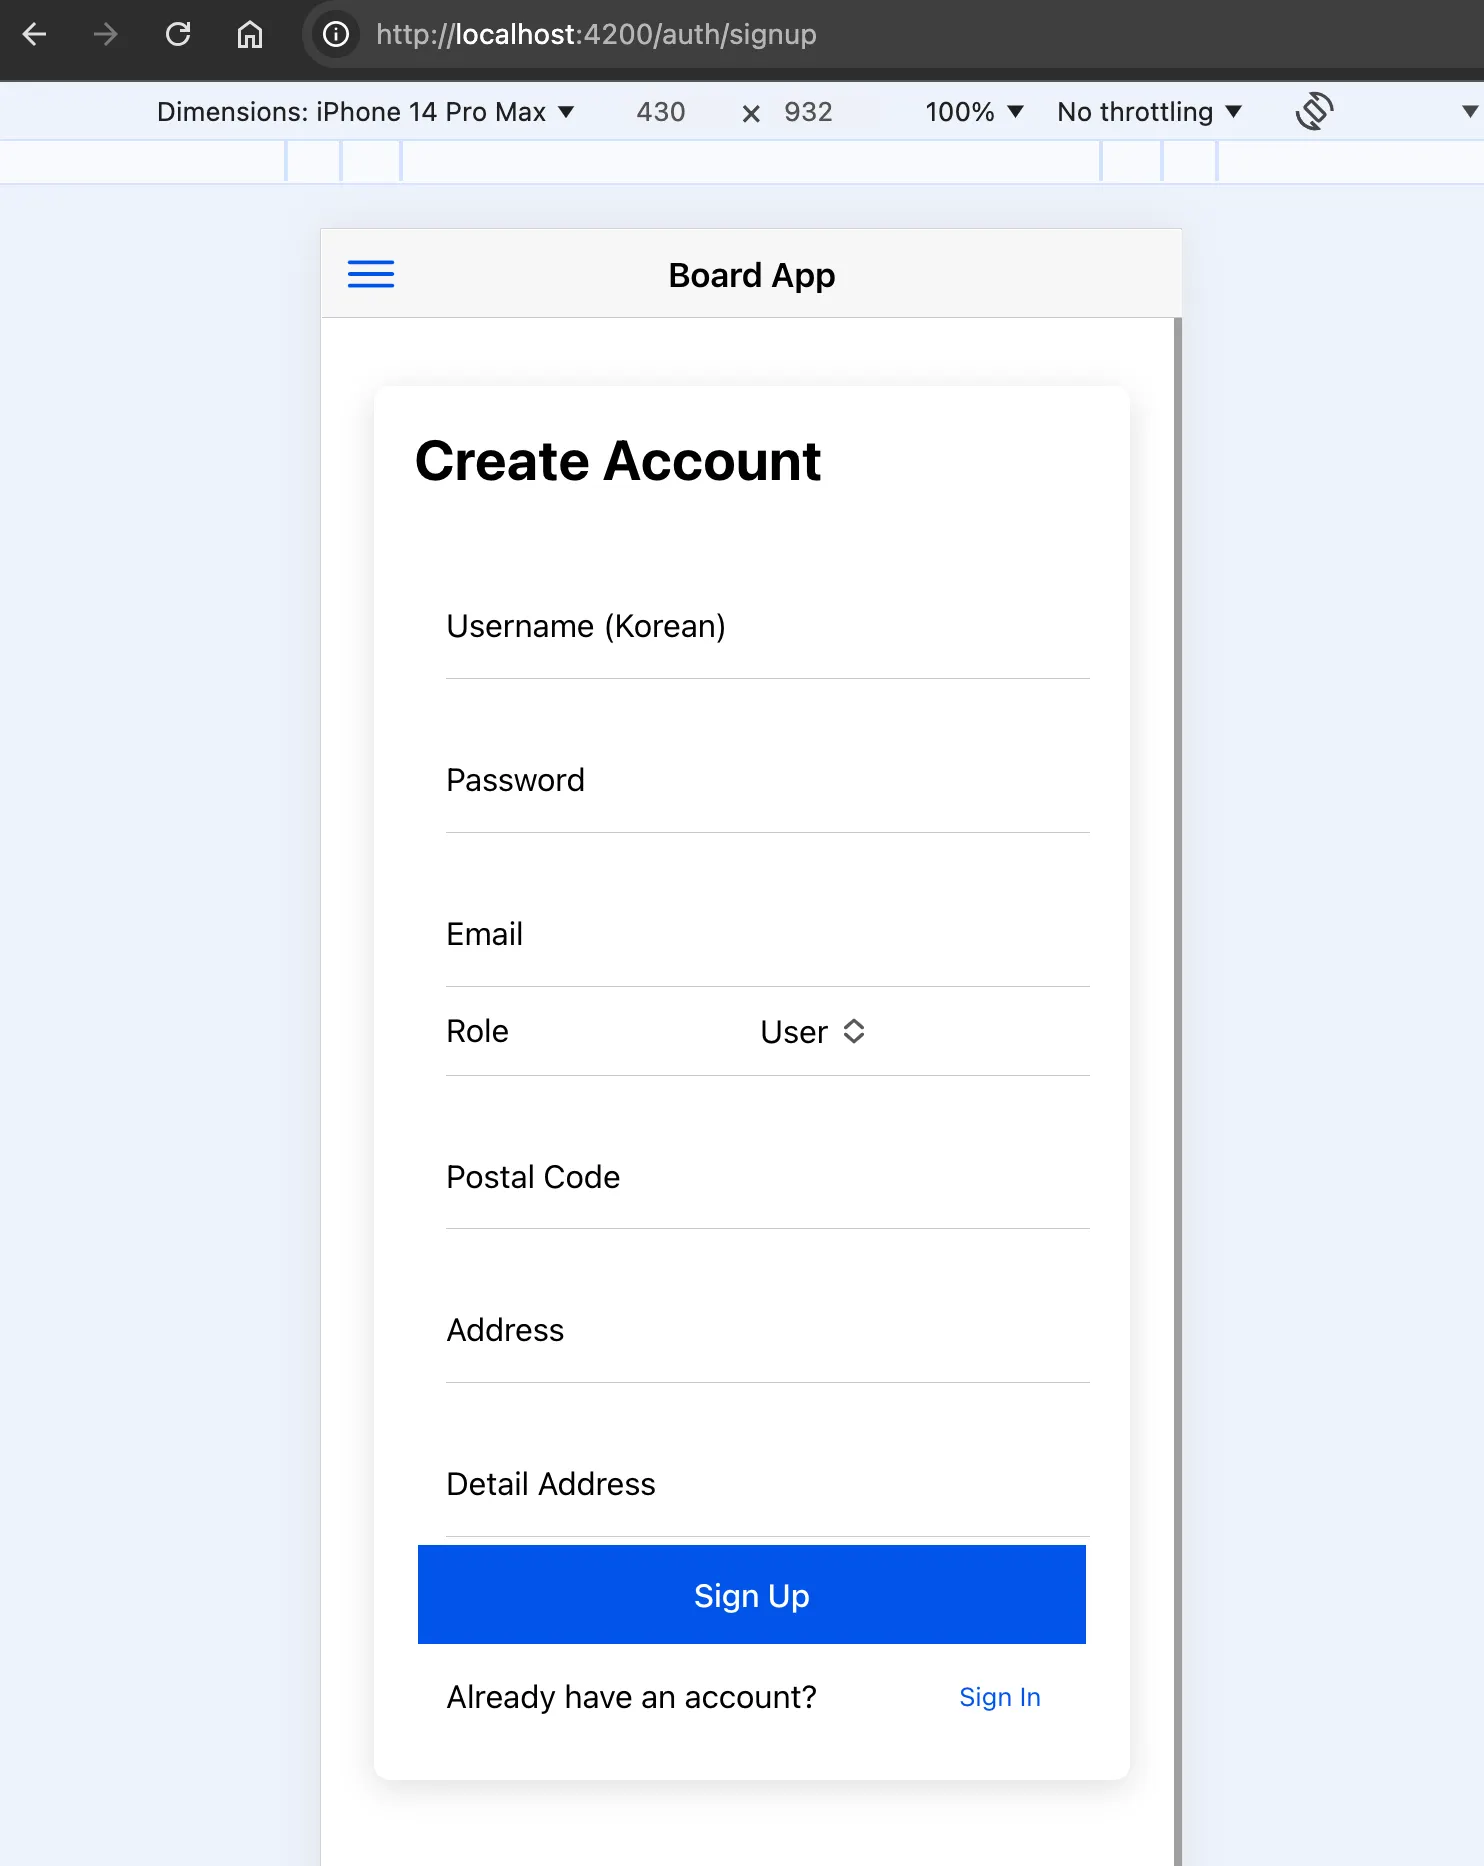
백엔드 API서버의 SignUpRequestDto를 고려하여 필드가 구성되어야 한다.
◦
필요한 필드는 username, password, email, role, postalCode, address, detailAddress로 구성했다.
<ion-header>
<ion-toolbar>
<ion-title>Sign Up</ion-title>
</ion-toolbar>
</ion-header>
<ion-content>
<ion-grid>
<ion-row>
<ion-col size="12">
<ion-card>
<ion-card-header>
<ion-card-title>Create Account</ion-card-title>
</ion-card-header>
<ion-card-content>
<form (ngSubmit)="onSignUp()">
<!-- Username Input -->
<ion-item>
<ion-label position="floating">Username (Korean)</ion-label>
<ion-input type="text" [(ngModel)]="username" name="username" required minlength="2" maxlength="20" pattern="^[가-힣]+$"></ion-input>
</ion-item>
<!-- Password Input -->
<ion-item>
<ion-label position="floating">Password</ion-label>
<ion-input type="password" [(ngModel)]="password" name="password" required minlength="8" pattern="^(?=.*[A-Z])(?=.*[a-z])(?=.*\d)(?=.*[@$!%*?&])[A-Za-z\d@$!%*?&]{8,}$"></ion-input>
</ion-item>
<!-- Password Input -->
<ion-item>
<ion-label position="floating">Password Confirm</ion-label>
<ion-input type="password" [(ngModel)]="passwordConfirm" name="passwordConfirm" required minlength="8"></ion-input>
</ion-item>
<!-- Email Input -->
<ion-item>
<ion-label position="floating">Email</ion-label>
<ion-input type="email" [(ngModel)]="email" name="email" required maxlength="100"></ion-input>
</ion-item>
<!-- Role Select -->
<ion-item>
<ion-label>Role</ion-label>
<ion-select [(ngModel)]="role" name="role" required>
<ion-select-option value="USER">User</ion-select-option>
<ion-select-option value="ADMIN">Admin</ion-select-option>
</ion-select>
</ion-item>
<!-- Postal Code Input -->
<ion-item>
<ion-label position="floating">Postal Code</ion-label>
<ion-input type="text" [(ngModel)]="postalCode" name="postalCode" required pattern="^\d{5}$"></ion-input>
</ion-item>
<!-- Address Input -->
<ion-item>
<ion-label position="floating">Address</ion-label>
<ion-input type="text" [(ngModel)]="address" name="address" required maxlength="100"></ion-input>
</ion-item>
<!-- Detail Address Input (Optional) -->
<ion-item>
<ion-label position="floating">Detail Address</ion-label>
<ion-input type="text" [(ngModel)]="detailAddress" name="detailAddress" maxlength="100"></ion-input>
</ion-item>
<!-- Sign Up Button -->
<ion-button expand="full" type="submit">Sign Up</ion-button>
</form>
<!-- Sign In Link -->
<ion-item lines="none">
<ion-label>Already have an account?</ion-label>
<ion-button fill="clear" routerLink="/auth/signin">Sign In</ion-button>
</ion-item>
</ion-card-content>
</ion-card>
</ion-col>
</ion-row>
</ion-grid>
</ion-content>
TypeScript
복사
기본 로그인 양식
•
signin.component.html
•
백엔드 API서버의 SignInRequestDto를 고려하여 필드가 구성되어야 한다.
◦
필요한 필드는 email, password 로 구성했다.
<ion-header>
<ion-toolbar>
<ion-title>Sign In</ion-title>
</ion-toolbar>
</ion-header>
<ion-content>
<ion-grid>
<ion-row>
<ion-col size="12">
<ion-card>
<ion-card-header>
<ion-card-title>Sign In</ion-card-title>
</ion-card-header>
<ion-card-content>
<form (ngSubmit)="onSignIn()">
<!-- Email Input -->
<ion-item>
<ion-label position="floating">Email</ion-label>
<ion-input type="email" [(ngModel)]="email" name="email" required maxlength="100"></ion-input>
</ion-item>
<!-- Password Input -->
<ion-item>
<ion-label position="floating">Password</ion-label>
<ion-input type="password" [(ngModel)]="password" name="password" required maxlength="20"></ion-input>
</ion-item>
<!-- Sign In Button -->
<ion-button expand="full" type="submit">Sign In</ion-button>
</form>
<!-- Sign Up Link -->
<ion-item lines="none">
<ion-label>Don't have an account?</ion-label>
<ion-button fill="clear" routerLink="/auth/signup">Sign Up</ion-button>
</ion-item>
</ion-card-content>
</ion-card>
</ion-col>
</ion-row>
</ion-grid>
</ion-content>
TypeScript
복사
5.1.3 기능 컴포넌트 메서드 기본 코드
세부 로직은 5.2에서 구현할 것이며 우선 각 필드로부터 값들만 받을 수 있도록 한다.
signup.component.ts
import { Component } from '@angular/core';
import { UserRole } from '../user-role.enum';
@Component({
selector: 'app-signup',
templateUrl: './signup.component.html',
styleUrls: ['./signup.component.scss'],
})
export class SignUpComponent {
username: string = '';
password: string = '';
passwordConfirm: string = '';
email: string = '';
role: UserRole = UserRole.USER;
postalCode: string = '';
address: string = '';
detailAddress: string = '';
constructor() {}
onSignUp() {
const signUpData = {
username: this.username,
password: this.password,
email: this.email,
role: this.role,
postalCode: this.postalCode,
address: this.address,
detailAddress: this.detailAddress,
};
console.log('Sign Up Data:', signUpData);
}
}
TypeScript
복사
signin.component.ts
import { Component } from '@angular/core';
@Component({
selector: 'app-signin',
templateUrl: './signin.component.html',
styleUrls: ['./signin.component.scss'],
})
export class SignInComponent {
email: string = '';
password: string = '';
constructor() {}
onSignIn() {
const signInData = {
email: this.email,
password: this.password,
};
console.log('Sign In Data:', signInData);
}
}
TypeScript
복사
5.1.4 컴포넌트 라우팅 연결 설정
라우팅 설정
•
추가되는 URL의 정보를 맵핑해야 한다.
•
루트 라우터 모듈과 auth 라우터 모듈에 각각 경로를 추가해야 한다.
◦
app-routing.module.ts
▪
localhost:4200/auth 까지의 경로를 루트 라우팅 모듈에 추가해준다.
import { NgModule } from '@angular/core';
import { RouterModule, Routes } from '@angular/router';
import { HomePage } from './home/home.page';
const routes: Routes = [
{
path: '',
component: HomePage
},
{
path: 'article-list',
loadChildren: () => import('./article/article-list/article-list.module').then(m => m.ArticleListPageModule)
},
{
path: 'auth',
loadChildren: () => import('./auth/auth.module').then(m => m.AuthModule)
}
];
@NgModule({
imports: [RouterModule.forRoot(routes)],
exports: [RouterModule]
})
export class AppRoutingModule {}
TypeScript
복사
◦
auth-routing.module.ts
▪
localhost:4200/auth/ 이후의 경로에 대한 설정이다.
•
localhost:4200/auth/signin 에서 로그인 기능을 수행한다.
•
localhost:4200/auth/signup 에서 회원 가입 기능을 수행한다.
•
localhost:4200/auth/ 는 기본 로그인 페이지를 리다이렉션 한다.
import { NgModule } from '@angular/core';
import { RouterModule, Routes } from '@angular/router';
import { SignInComponent } from './signin/signin.component';
import { SignUpComponent } from './signup/signup.component';
const routes: Routes = [
{
path: '',
redirectTo: 'signin',
pathMatch: 'full'
},
{
path: 'signin', component: SignInComponent
},
{
path: 'signup', component: SignUpComponent
},
];
@NgModule({
imports: [RouterModule.forChild(routes)],
exports: [RouterModule]
})
export class AuthRoutingModule { }
TypeScript
복사
5.1.5 페이지 구성 변경
app.component.html
•
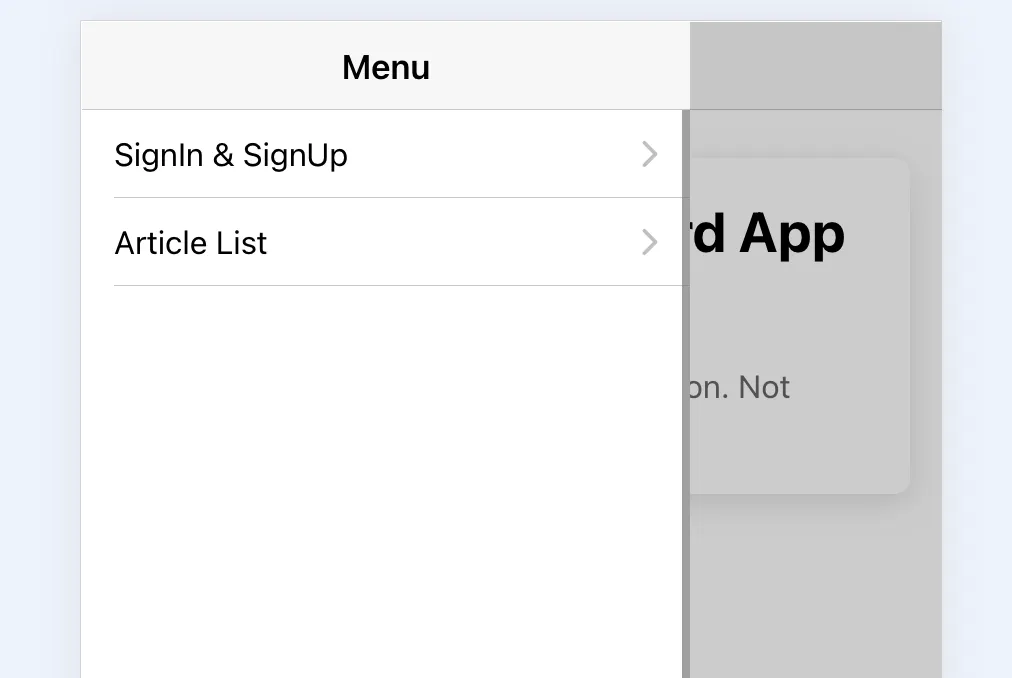
기능이 추가되어 여러 메뉴를 이동 할 수 있는 네비게이터가 필요해졌다.
•
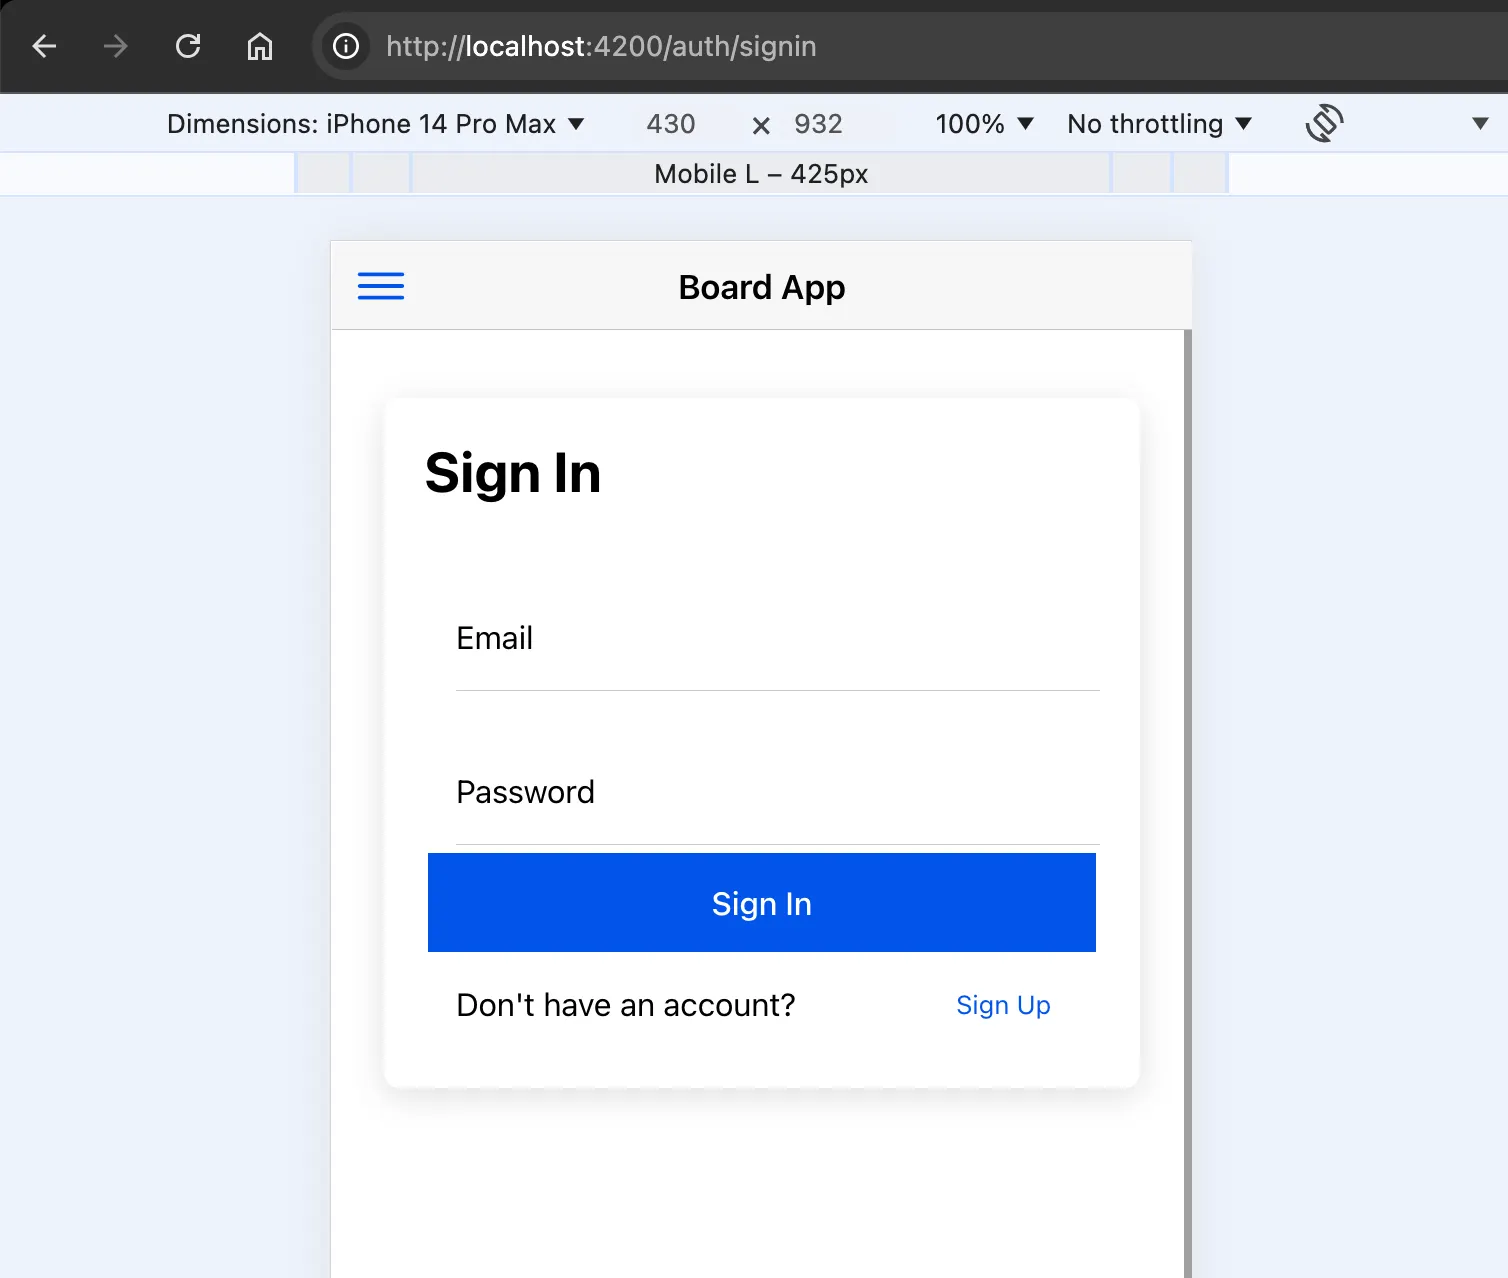
기본적으로 로그인 화면이 먼저 나타나며, 필요시 회원가입으로 이동 할 수 있도록 구성했다.
<ion-app>
<!-- 사이드 메뉴 설정 -->
<ion-menu side="start" contentId="main-content">
<ion-header>
<ion-toolbar>
<ion-title>Menu</ion-title>
</ion-toolbar>
</ion-header>
<ion-content>
<ion-list>
<ion-item routerLink="/auth">SignIn & SignUp</ion-item>
<ion-item routerLink="/article-list">Article List</ion-item>
</ion-list>
</ion-content>
</ion-menu>
<!-- 메인 콘텐츠 설정 -->
<ion-header>
<ion-toolbar>
<ion-buttons slot="start">
<ion-menu-button></ion-menu-button>
</ion-buttons>
<ion-title>
Board App
</ion-title>
</ion-toolbar>
</ion-header>
<ion-router-outlet id="main-content"></ion-router-outlet>
</ion-app>
TypeScript
복사
•
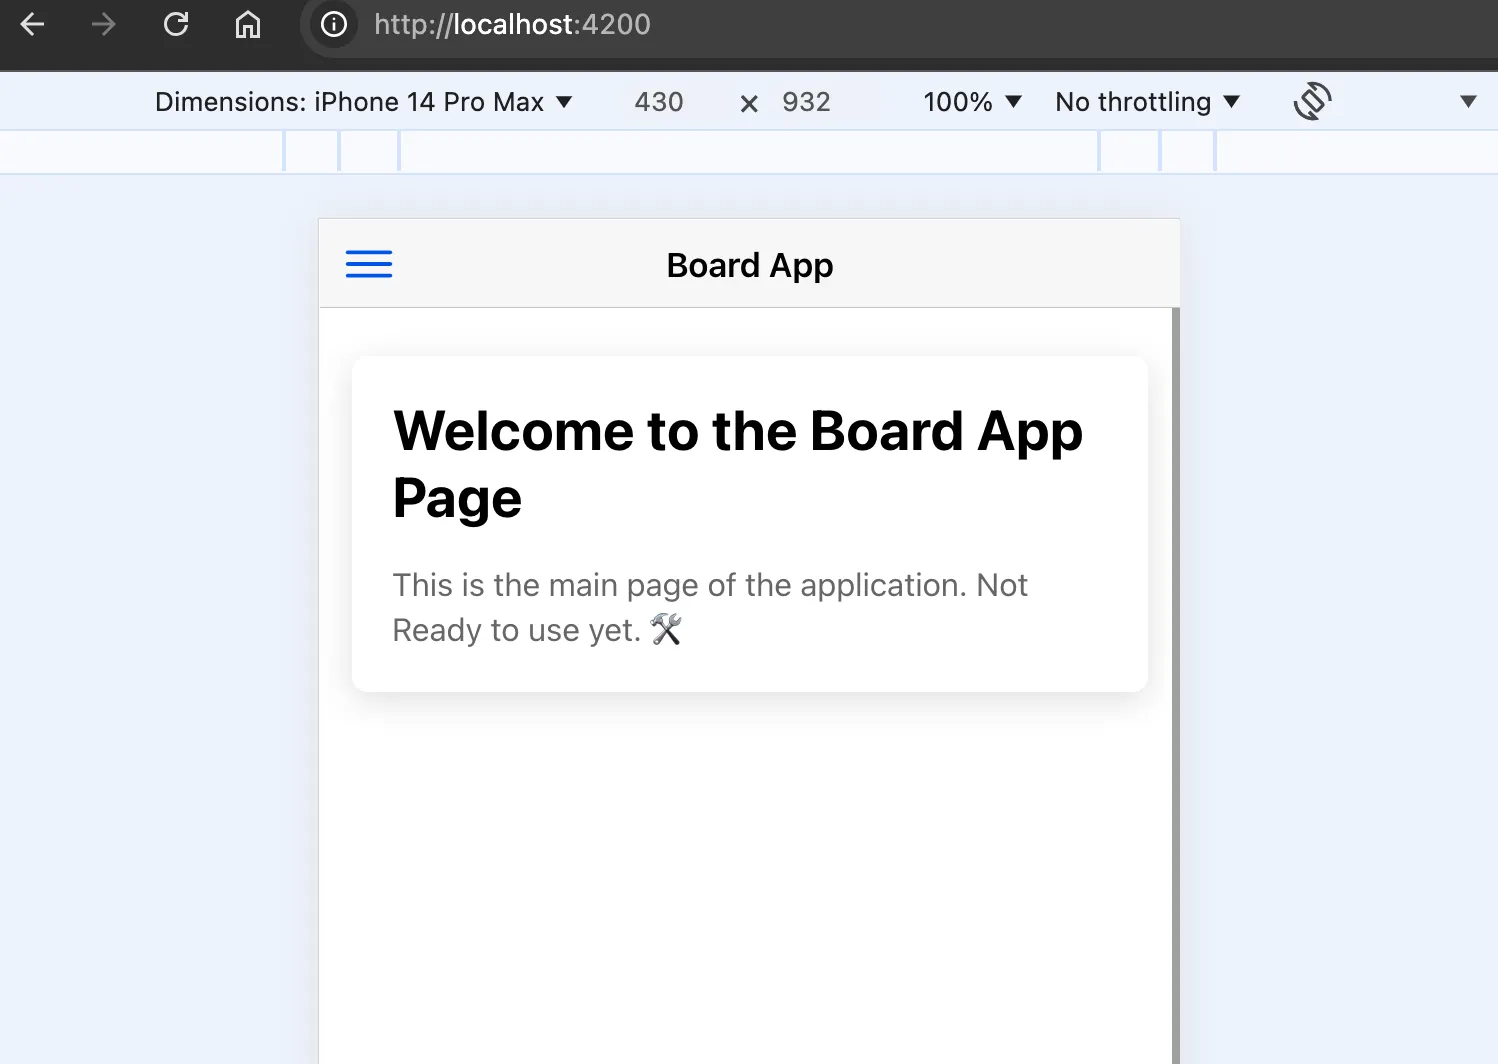
브라우저에서의 테스트
◦
메인 인덱스
◦
네비게이션 메뉴 추가
◦
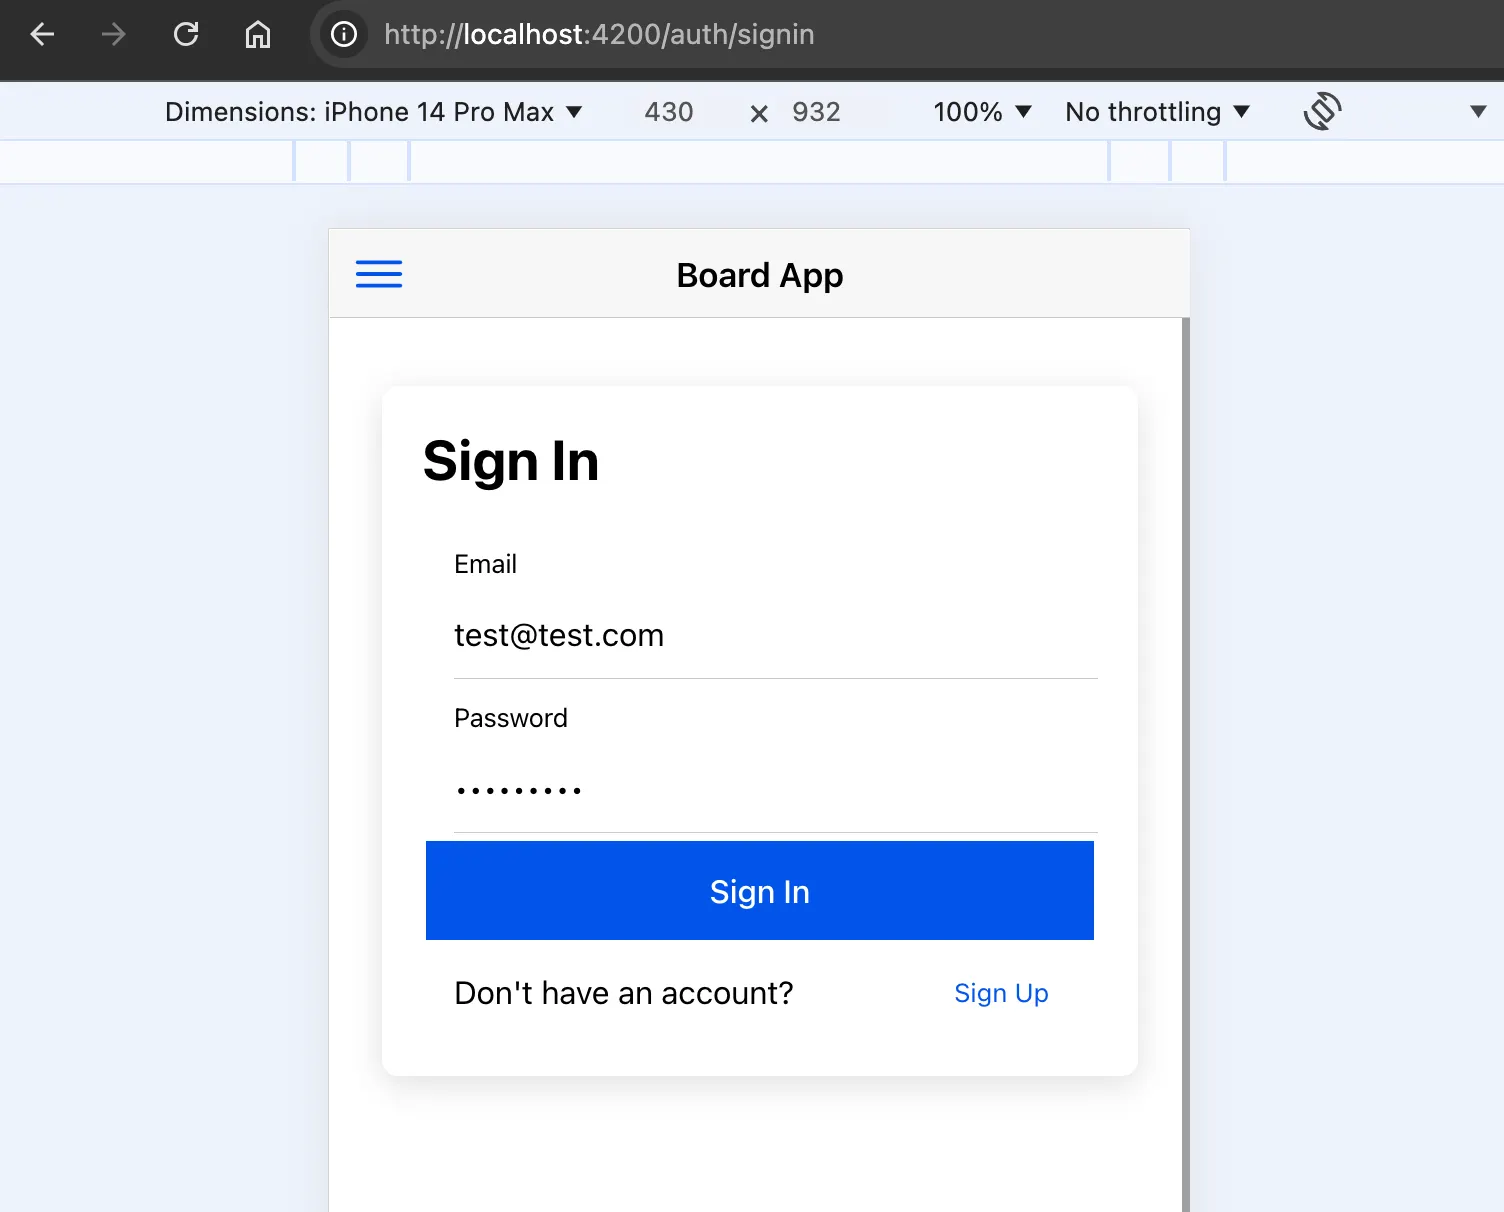
Signin & SignUp 메뉴 이동시 나타나는 로그인 페이지
◦
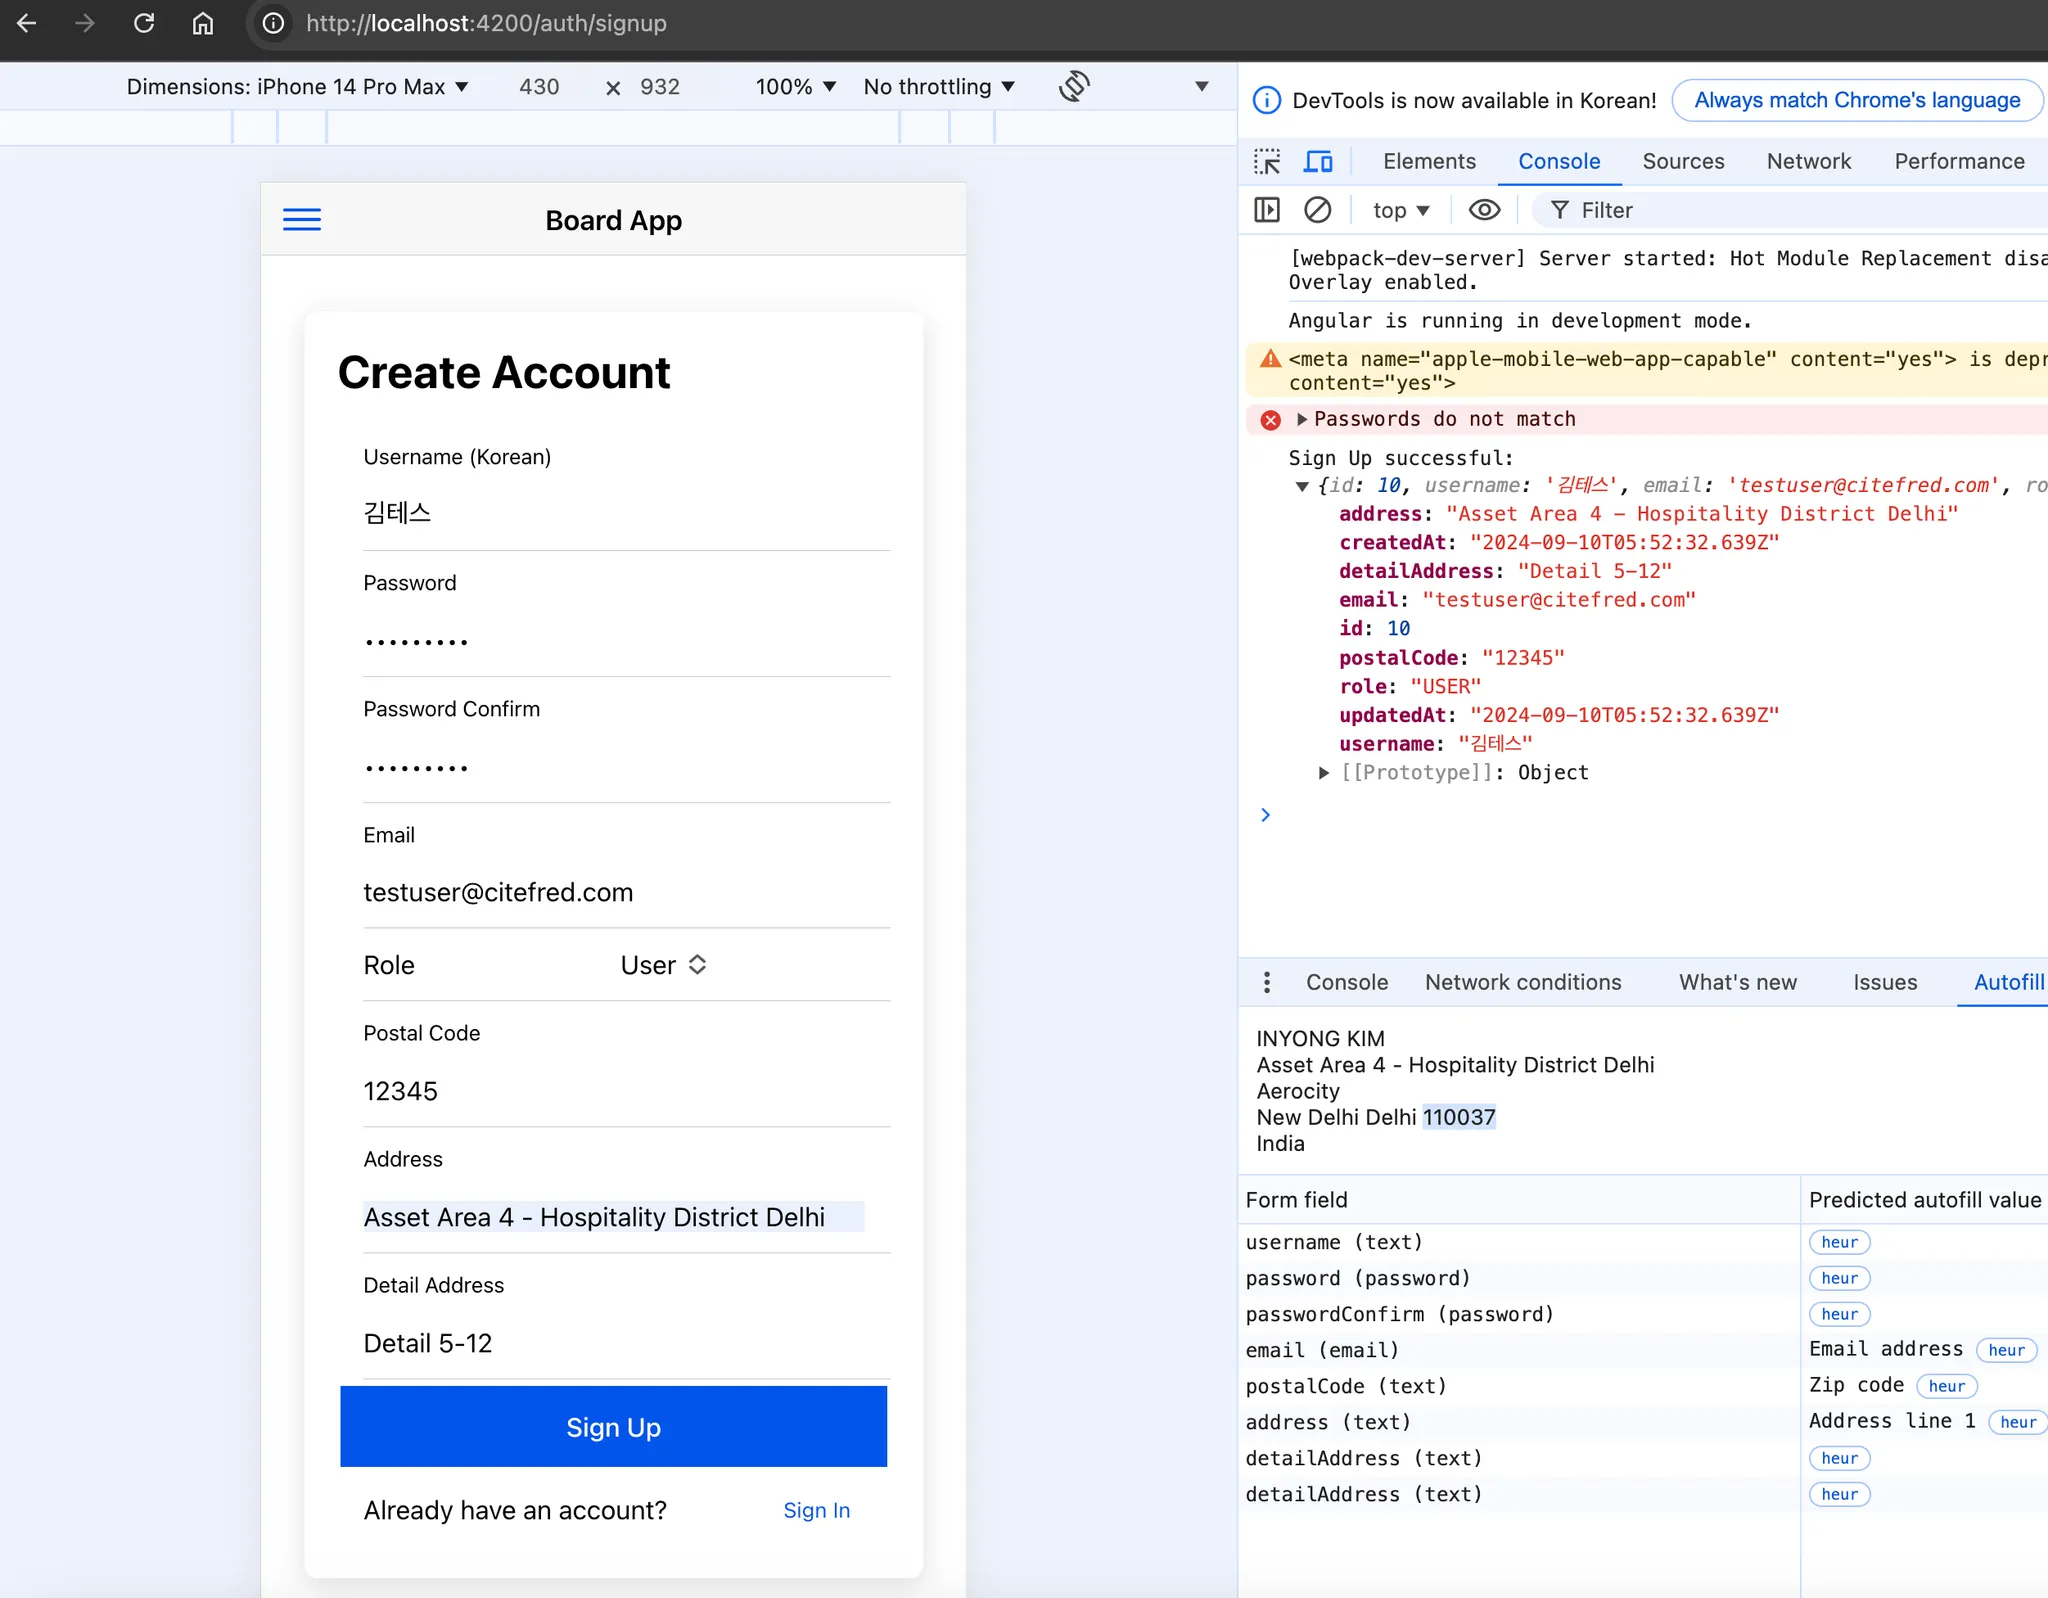
회원 가입 페이지
5.2 기본 인증 API 연결
5.2.1 회원가입 API 연결
signup.component.ts
•
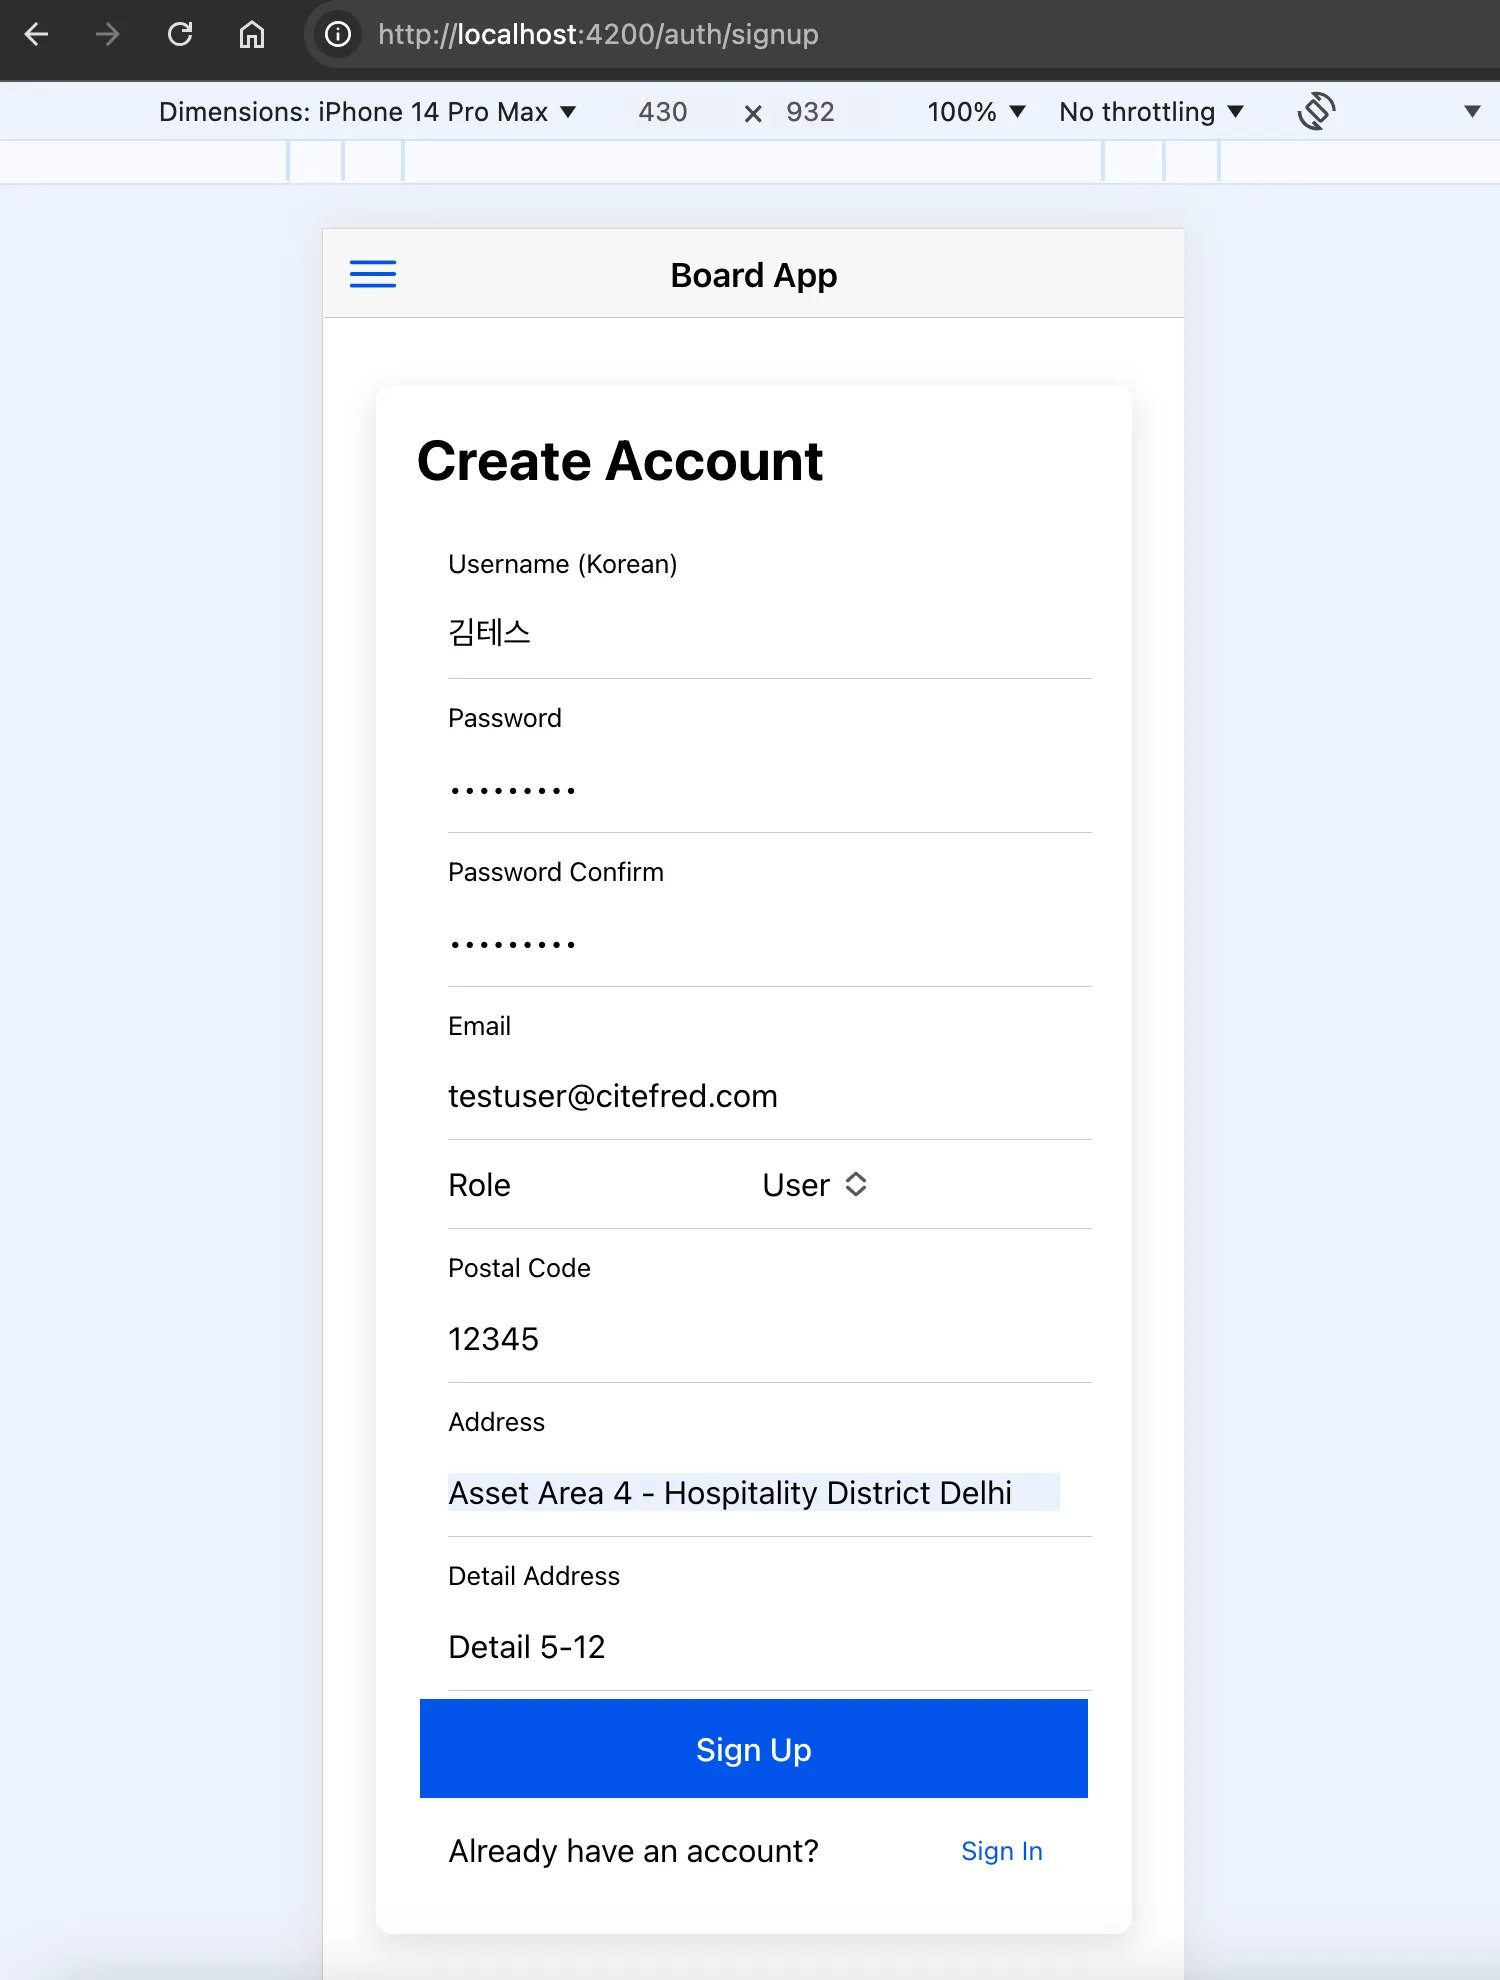
프론트엔드 필드로부터 각 변수에 값을 할당하여 회원가입 데이터를 생성한다.
•
입력된 패스워드를 확인하는 passwordConfirm 필드 추가
◦
회원가입 요청 전 프론트엔드에서 입력 패스워드 확인
◦
이후 signUpData 객체로 각 필드의 값을 key:value 형태로 저장
◦
authService 클래스에 정의된 signUp(signUpData) 메서드를 호출하며 객체를 전달
import { Component } from '@angular/core';
import { AuthService } from '../auth.service';
import { UserRole } from '../user-role.enum';
import { Router } from '@angular/router';
@Component({
selector: 'app-signup',
templateUrl: './signup.component.html',
styleUrls: ['./signup.component.scss'],
})
export class SignUpComponent {
username: string = '';
password: string = '';
passwordConfirm: string = '';
email: string = '';
role: UserRole = UserRole.USER;
postalCode: string = '';
address: string = '';
detailAddress: string = '';
constructor(private authService: AuthService, private router: Router) {}
async onSignUp() {
if (this.password !== this.passwordConfirm) {
console.error('Passwords do not match');
return;
}
const signUpData = {
username: this.username,
password: this.password,
email: this.email,
role: this.role,
postalCode: this.postalCode,
address: this.address,
detailAddress: this.detailAddress,
};
try {
const response = await this.authService.signUp(signUpData);
if (response.success) {
console.log('Sign Up successful:', response.data);
// Redirect or show a success message
this.router.navigate(['auth']);
} else {
console.error('Sign Up failed:', response.message);
}
} catch (error) {
console.error('Sign Up error:', error);
}
}
}
TypeScript
복사
auth.service.ts
•
컴포넌트로부터 전달받은 signUpData 회원 입력 정보 객체를 signUp()메서드에서 파라미터로 사용
◦
JSON.stringify()를 통해 해당 객체를 JSON 타입으로 변환
◦
fetch를 통해 JSON 데이터를 API 서버 URL(localhost:3000/api/auth/signup) 으로 POST 요청
import { Injectable } from '@angular/core';
@Injectable({
providedIn: 'root'
})
export class AuthService {
private apiUrl = 'http://localhost:3000/api/auth';
constructor() { }
async signUp(signUpData: any): Promise<any> {
try {
const response = await fetch(`${this.apiUrl}/signup`, {
method: 'POST',
headers: {
'Content-Type': 'application/json',
},
body: JSON.stringify(signUpData),
});
// 응답 상태 코드와 메시지 확인
if (!response.ok) {
const errorText = await response.text(); // 에러 메시지 읽기
console.error('Network response was not ok:', errorText);
throw new Error(`Network response was not ok: ${response.statusText}`);
}
const data = await response.json();
return data;
} catch (error) {
console.error('Fetch error:', error);
throw error;
}
}
}
TypeScript
복사
•
브라우저를 통한 테스트
◦
클라이언트 정보 입력
◦
회원 가입 요청
◦
API 서버에서의 쿼리 실행 화면
5.2.2 로그인 API 연결
현재 백엔드 API 서버에서는 JWT 토큰을 발급하고있으며, 응답 Header에 담아서 보내고 있다.
•
Header 방식으로 JWT 토큰을 전달 받으면 클라이언트는 상태 유지를 위한 토큰 저장 방식을 결정해야 한다
◦
브라우저의 localstorage를 사용할 예정
◦
따라서 이후 요청을 보낼 때 localstorage로부터 JWT 토큰을 Header 에 담아 보내야 한다
Cookie를 사용하는 경우
signin.component.ts
•
프론트엔드 필드로부터 각 변수에 값을 할당하여 회원 로그인 데이터를 생성한다.
•
로그인에 필요한 필드
◦
회원의 고유값(unique)으로 지정한 email 필드가 아이디로 사용된다.
◦
해당 계정의 비밀번호 password
▪
두 값중에 하나가 틀리더라도 특정 필드가 틀린 예외가 아닌 email or password 등 계정 정보가 틀렸다는 공통 예외를 반환하고 있다. (보안)
•
이후 signInData 객체로 각 필드의 값을 key:value 형태로 저장
◦
authService 클래스에 정의된 signIn(signInData) 메서드를 호출하며 객체를 전달
import { Component, OnInit } from '@angular/core';
import { AuthService } from '../../../services/auth.service';
import { Router } from '@angular/router';
@Component({
selector: 'app-signin',
templateUrl: './signin.component.html',
styleUrls: ['./signin.component.scss'],
standalone: false
})
export class SigninComponent implements OnInit {
email: string = '';
password: string = '';
constructor(
private authService: AuthService,
private router: Router
) { }
ngOnInit() {}
async onSignIn() {
const signInData = {
email: this.email,
password: this.password,
}
console.log('signInData:', signInData);
this.authService.signIn(signInData).subscribe({
next: response => {
if (response.success) {
this.router.navigate(['/']);
} else {
console.error('Sign In failed:', response.message);
}
},
error: err => {
console.error('Sign In error:', err);
},
complete: () => {
console.log('Sign In request completed.');
}
});
}
}
TypeScript
복사
auth.service.ts
•
컴포넌트로부터 전달받은 signInData 회원 입력 정보 객체를 signIn()메서드에서 파라미터로 사용
◦
JSON.stringify()를 통해 해당 객체를 JSON 타입으로 변환
◦
fetch를 통해 JSON 데이터를 API 서버 URL(localhost:3000/api/auth/signin) 으로 POST 요청
◦
응답 헤더의 JWT 토큰을 클라이언트 localstorage로 저장
import { Injectable } from '@angular/core';
import { ApiResponse } from '../common/api-response.interface';
import { SignUpRequest } from '../common/sign-up-request.interface';
import { SignInRequest } from '../common/sign-in-request.interface';
@Injectable({
providedIn: 'root'
})
export class AuthService {
private apiUrl = 'http://localhost:3000/api' // auth와 확인 필요
constructor() { }
async signUp(signUpData: SignUpRequest): Promise<ApiResponse<void>> {
try {
console.log('signUpdata: ',signUpData)
const response = await fetch(`${this.apiUrl}/users`, {
method: 'POST',
headers: {
'Content-Type': 'application/json',
},
body: JSON.stringify(signUpData)});
if (!response.ok) {
const errorText = await response.text();
console.log(errorText);
throw new Error(errorText)
}
const data = await response.json();
return data;
} catch (error) {
console.error(error);
throw error
}
}
async signIn(signInData: SignInRequest): Promise<ApiResponse<void>> {
try {
console.log('signIndata: ',signInData)
const response = await fetch(`${this.apiUrl}/auth/signin`, {
method: 'POST',
headers: {
'Content-Type': 'application/json',
},
body: JSON.stringify(signInData)});
if (!response.ok) {
const errorText = await response.text();
console.log(errorText);
throw new Error(errorText)
}
// API 서버의 응답 헤더에서 JWT 토큰을 추출
const token = response.headers.get('Authorization');
if (token) {
localStorage.setItem('jwtToken', token); // 헤더에서 추출한 토큰을 클라이언트 localStorage에 저장
}
const data = await response.json();
return data;
} catch (error) {
console.error(error);
throw error
}
}
}
TypeScript
복사
•
브라우저를 통한 테스트
◦
로그인 관련 필드 입력
◦
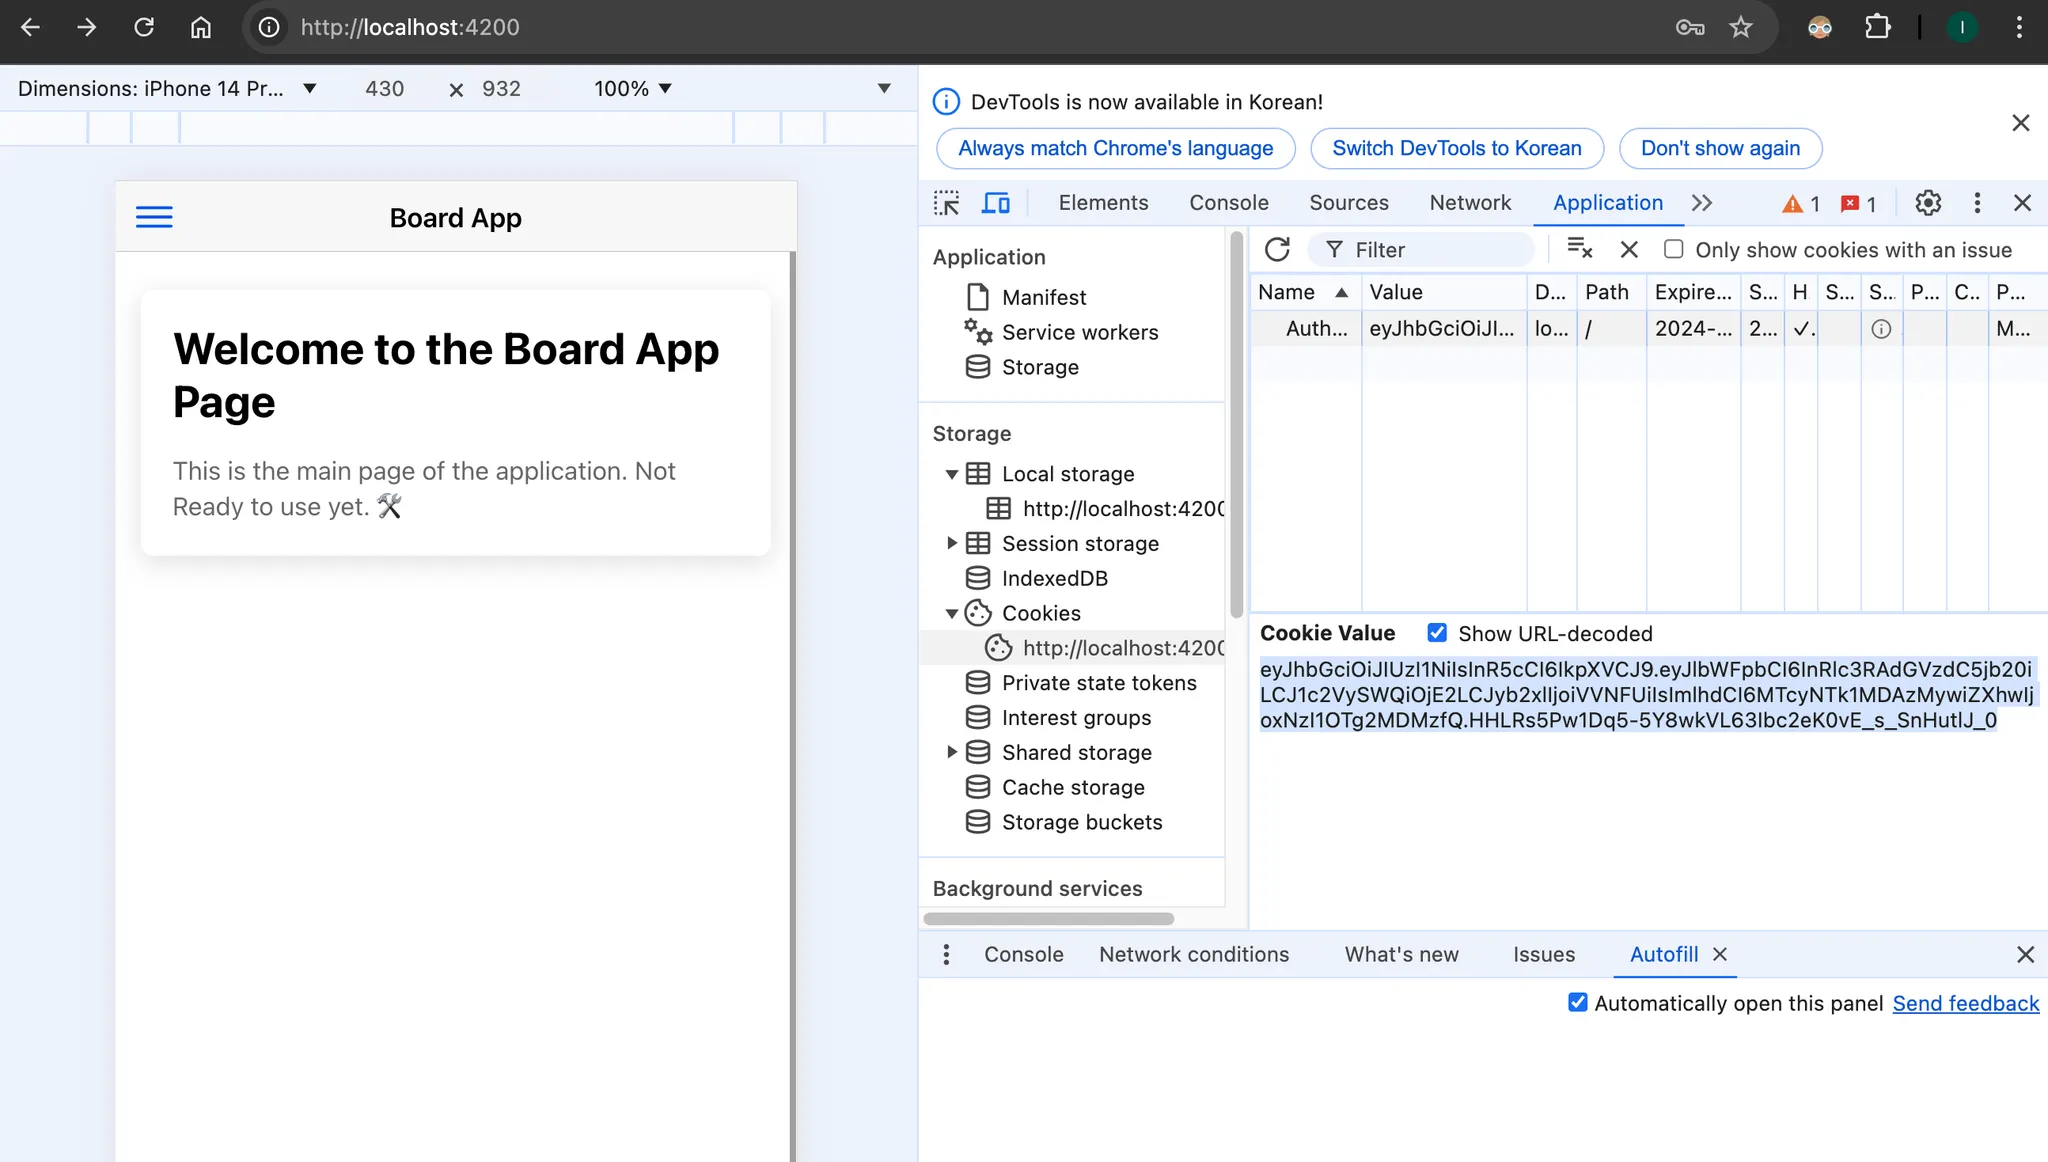
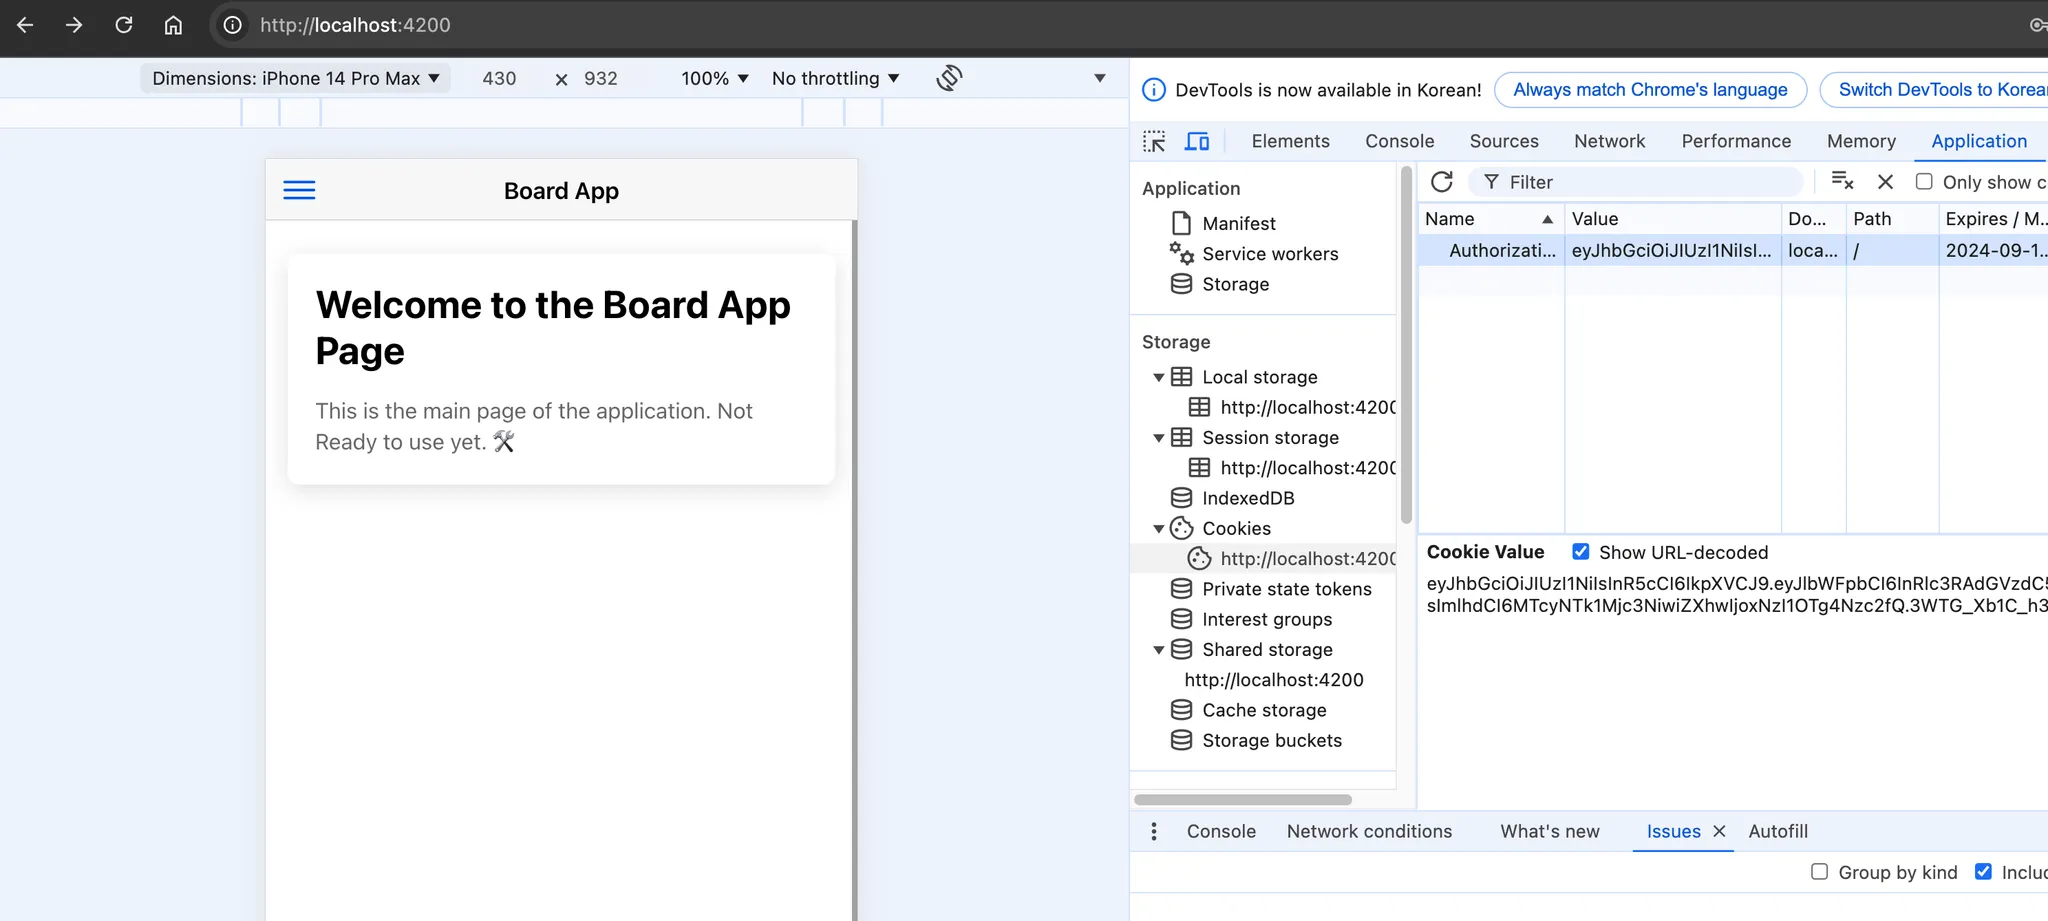
로그인 성공 시 Authorization 이름(name)의 값(value)으로 JWT 암호화된 토큰이 들어 있다. 이를 통해 로그인 상태를 유지
◦
로그인 성공 시 메인 페이지로 리다이렉션
▪
JWT 토큰의 헤더→로컬스토리지 저장
▪
JWT 토큰의 쿠키 자동 저장
5.3 JWT 토큰을 함께 요청
5.3.1 현재 JWT 토큰에 대한 설정 상태 확인
이제 JWT 토큰을 클라이언트가 저장하는 것을 확인하게 되었다.
•
현재 방식은 Header JWT 토큰을 localstorage 에 저장하고 있다.
•
이후 역할에 대한 접근 제한된 API에 접근하기 위해서는 JWT 토큰을 요청과 함께 보내 허가된 사용자임을 인증하는 과정이 있어야 한다.
•
백엔드 API에서는 Guard를 통해 인가를 제어 할 수 있는 구성이 되어있다.
◦
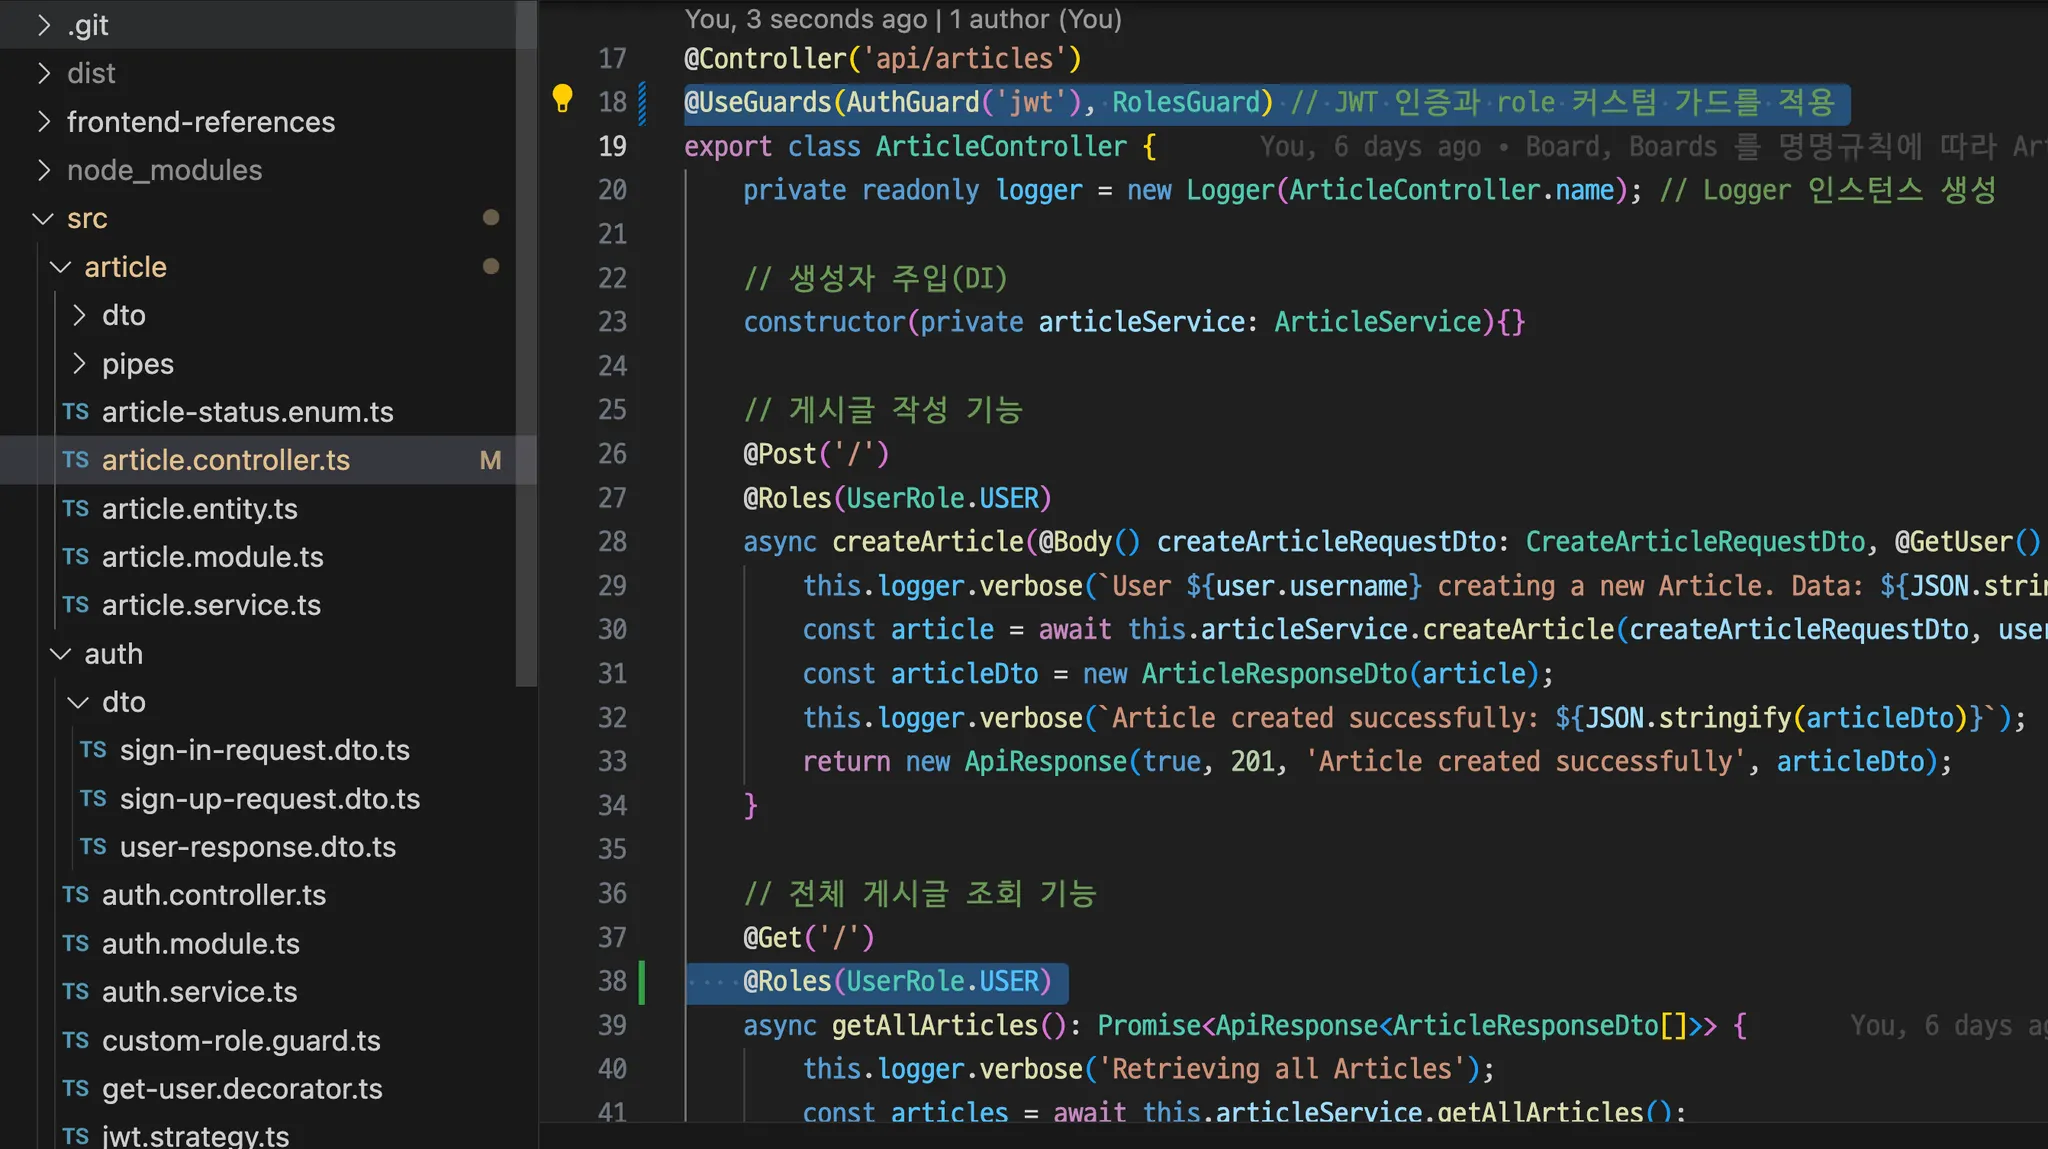
@UseGuard 데코레이터 재 활성화
◦
@Roles(UserRole.USER) 커스텀 데코레이터로 USER 역할 확인 활성화
◦
현재 게시글 조회 API 자체에 로그인된 회원의 역할이 ‘USER’만 조회 할 수 있도록 역할 제한을 추가하여 테스트하고자 한다.
•
백엔드 API 서버의 article.controller.ts
•
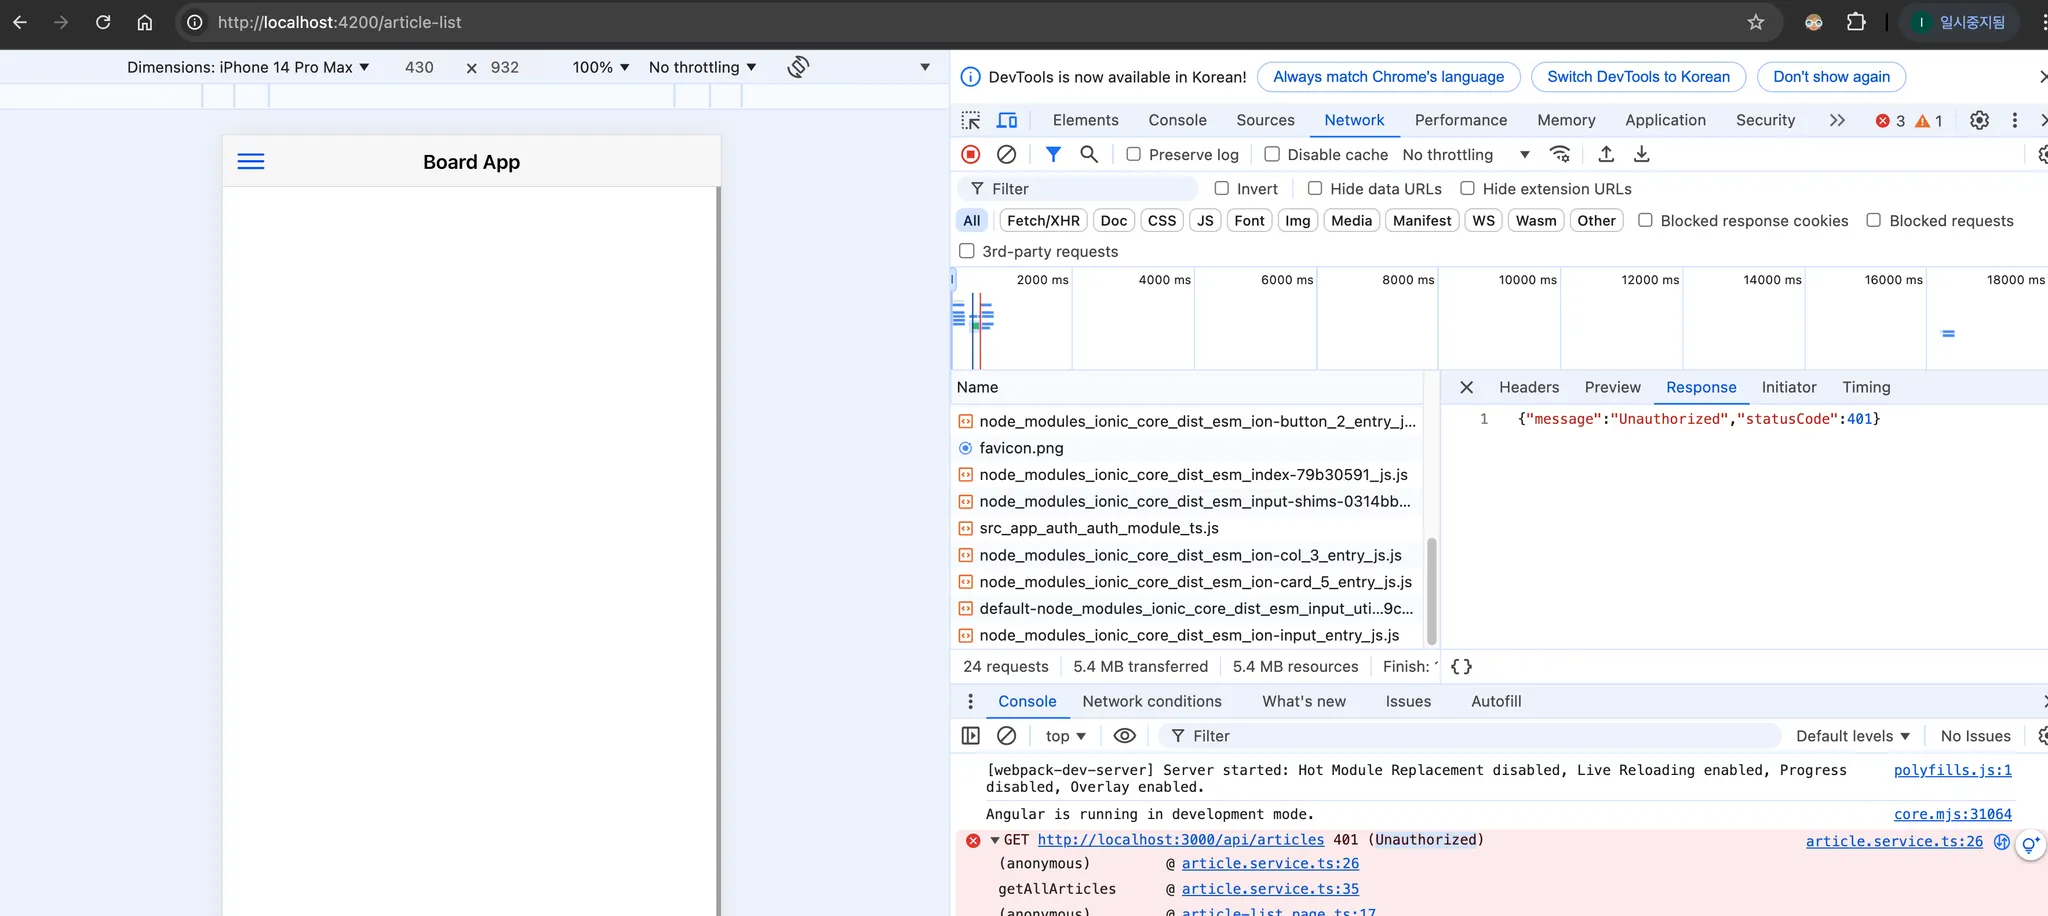
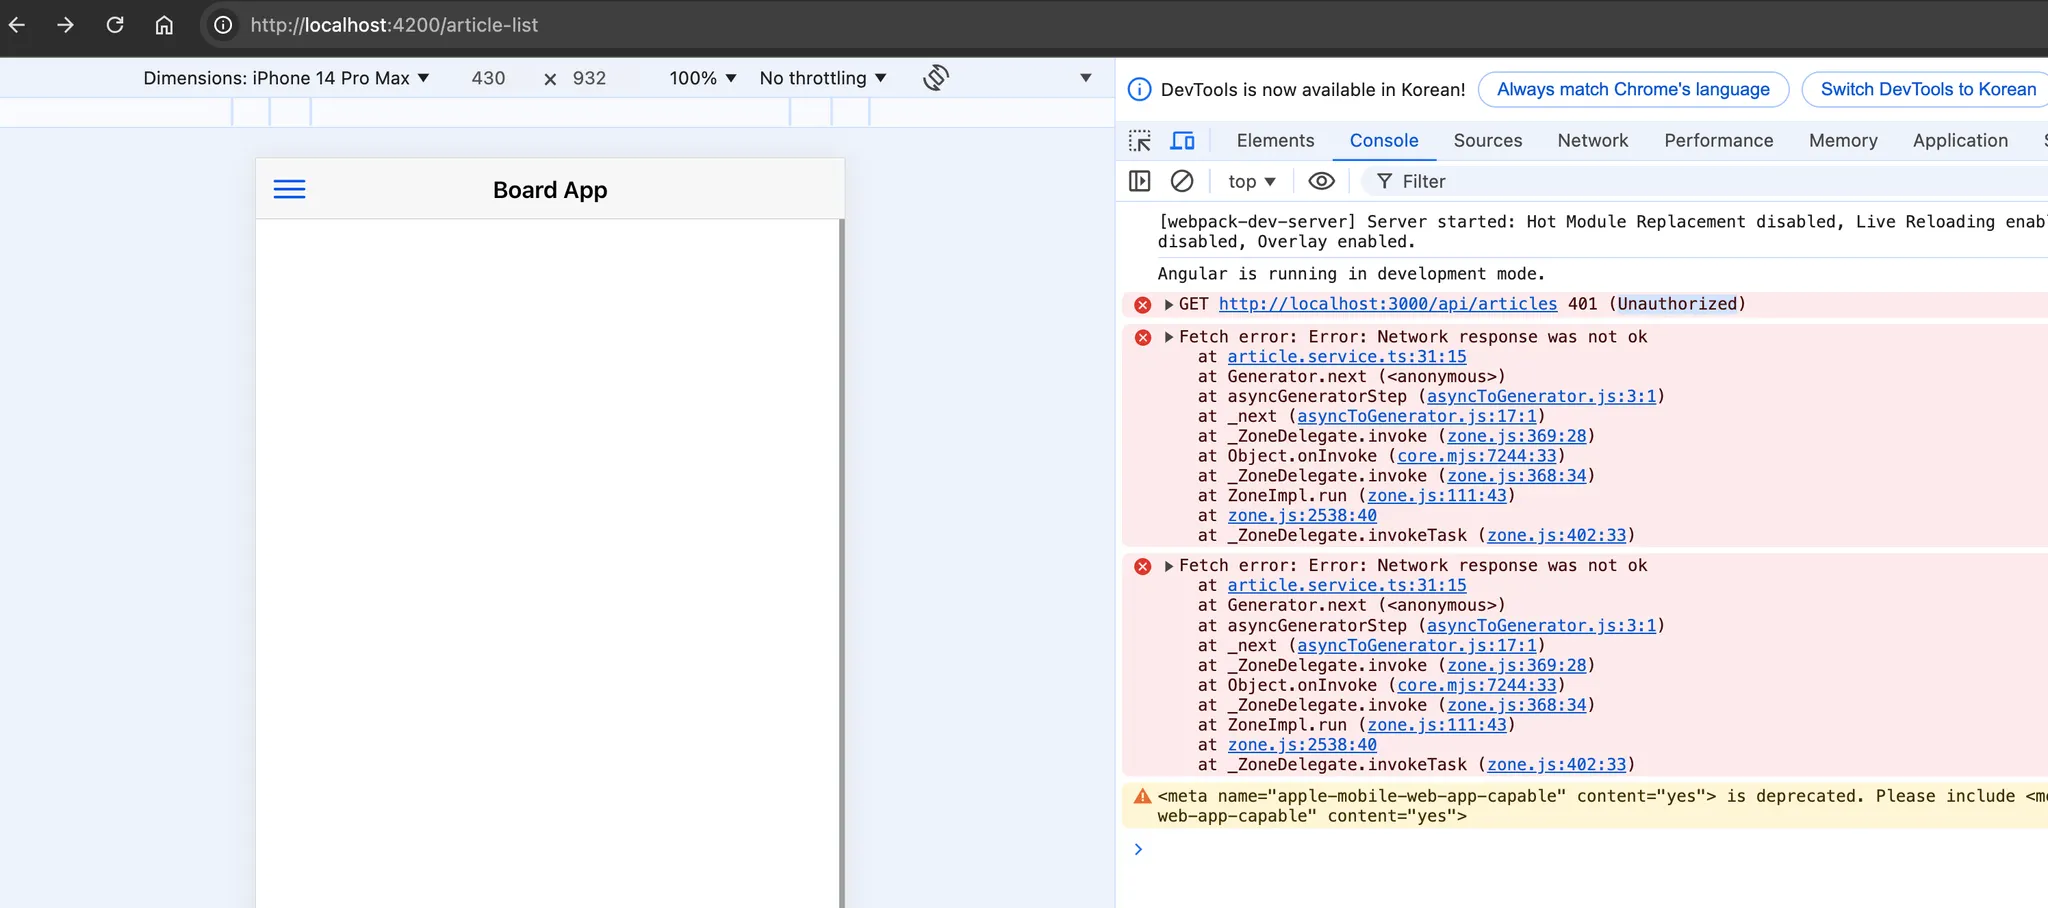
가드 활성화 후 접근 권한 없는 상태
쿠키 방식일 때 오류가 발생한다면?
프론트엔드에서는 요청에 JWT를 담아서 보내면 된다.
•
fetch에서 headers 속성을 추가하여 헤더에 토큰을 담아 보낼 수 있다.
◦
만약 쿠키를 사용한다면 별도 헤더 설정 없이도credentials 를 통해서 쿠키를 포함 시킬 수 있다.
•
프론트엔드 article.service.ts
import { Injectable } from '@angular/core';
import { ApiResponse } from '../common/api-response.interface';
import { Article } from '../common/article-response.interface';
@Injectable({
providedIn: 'root'
})
export class ArticlesService {
private apiUrl = 'http://localhost:3000/api/articles';
async getAllArticles(): Promise<ApiResponse<Article[]>> {
try {
const token = localStorage.getItem('jwtToken'); // 로컬스토리지에서 JWT 토큰 가져오기
const response = await fetch(`${this.apiUrl}`, {
method: 'GET',
headers: {
'Content-Type': 'application/json',
'Authorization': token ? token : '', // JWT 토큰을 헤더에 포함
// 쿠키를 사용하는 경우, credentials를 'include'로 설정하여 요청에 쿠키를 포함
// 'credentials': 'include',
},
});
if (!response.ok) {
throw new Error('Network response was not ok');
}
const data: ApiResponse<Article[]> = await response.json();
return data;
} catch (error) {
console.error('Fetch error', error);
throw error;
}
}
async getArticleById(id: number): Promise<ApiResponse<Article>> {
try {
const token = localStorage.getItem('jwtToken'); // 로컬스토리지에서 JWT 토큰 가져오기
const response = await fetch(`${this.apiUrl}/${id}`, {
method: 'GET',
headers: {
'Content-Type': 'application/json',
'Authorization': token ? token : '', // JWT 토큰을 헤더에 포함
// 쿠키를 사용하는 경우, credentials를 'include'로 설정하여 요청에 쿠키를 포함
// 'credentials': 'include',
},
});
if (!response.ok) {
throw new Error('Network response was not ok');
}
const data: ApiResponse<Article> = await response.json();
return data;
} catch (error) {
console.error('Fetch error', error);
throw error;
}
}
}
TypeScript
복사
•
브라우저를 통한 테스트
◦
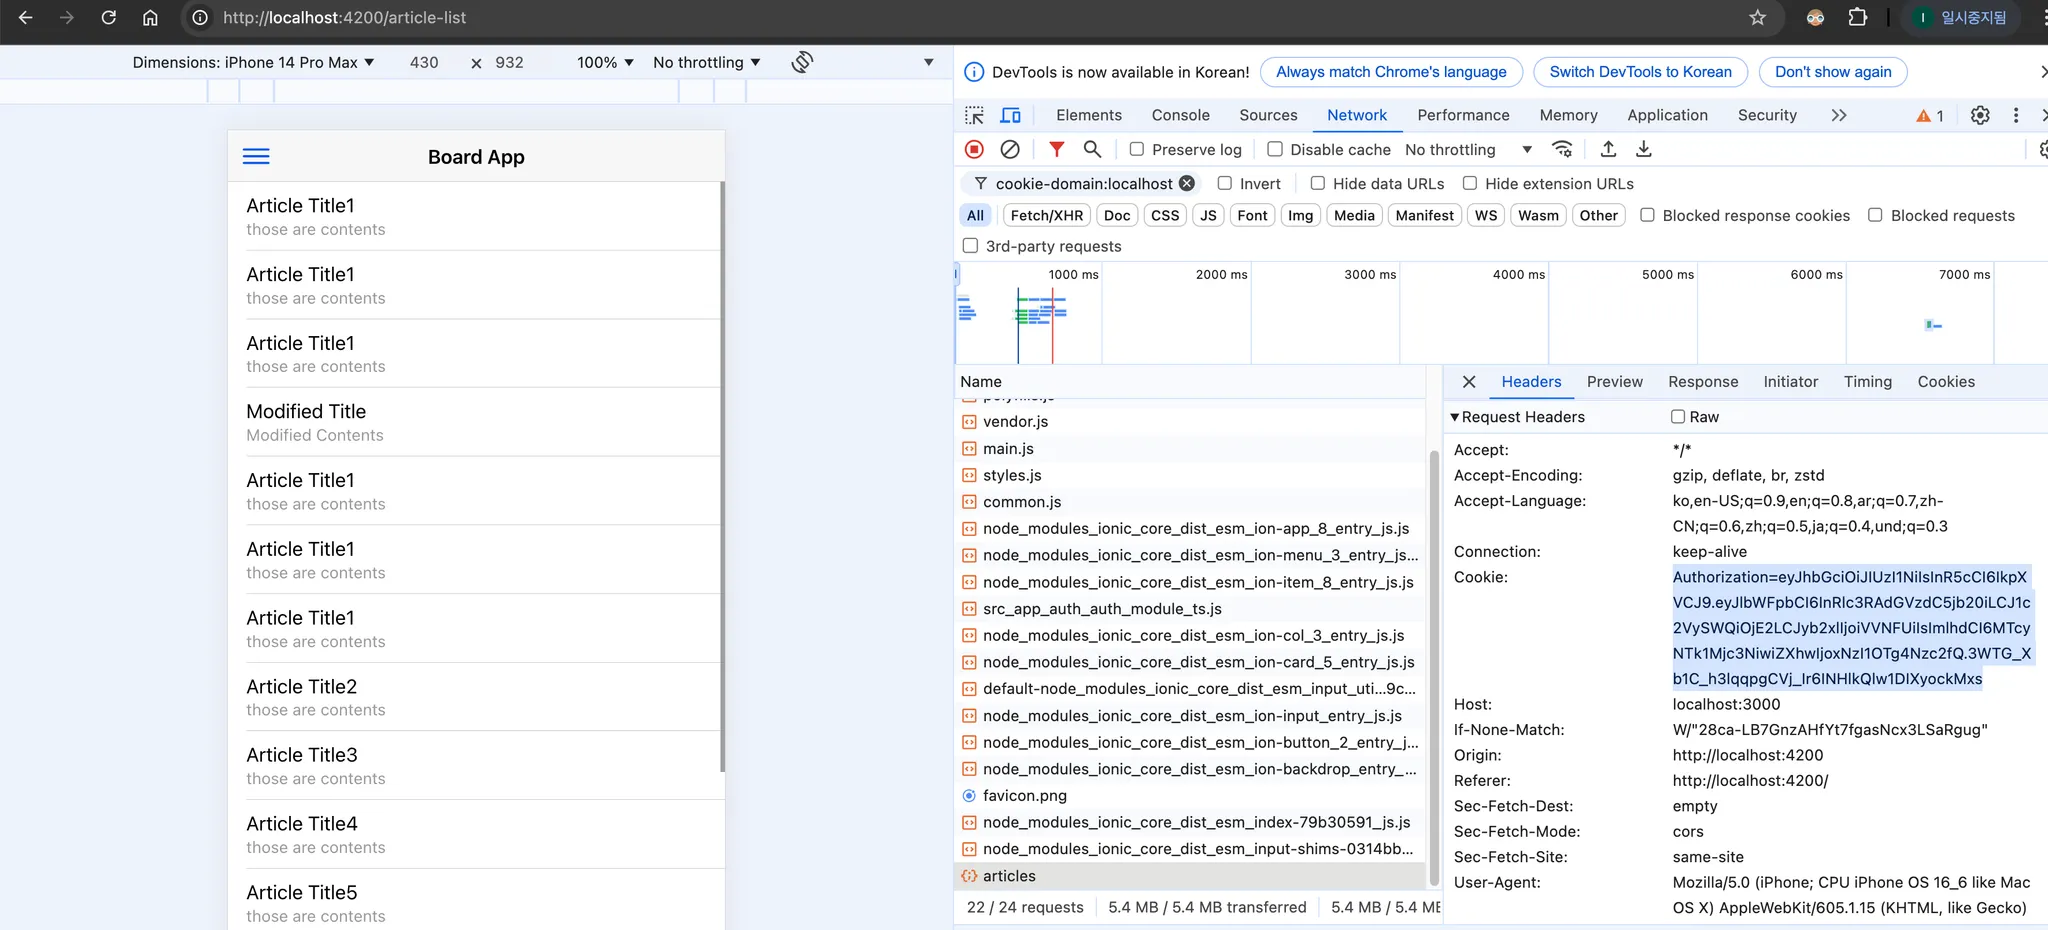
로그인 상태 유지
◦
게시글 목록 조회 요청, Request JWT 토큰이 함께 전송
◦
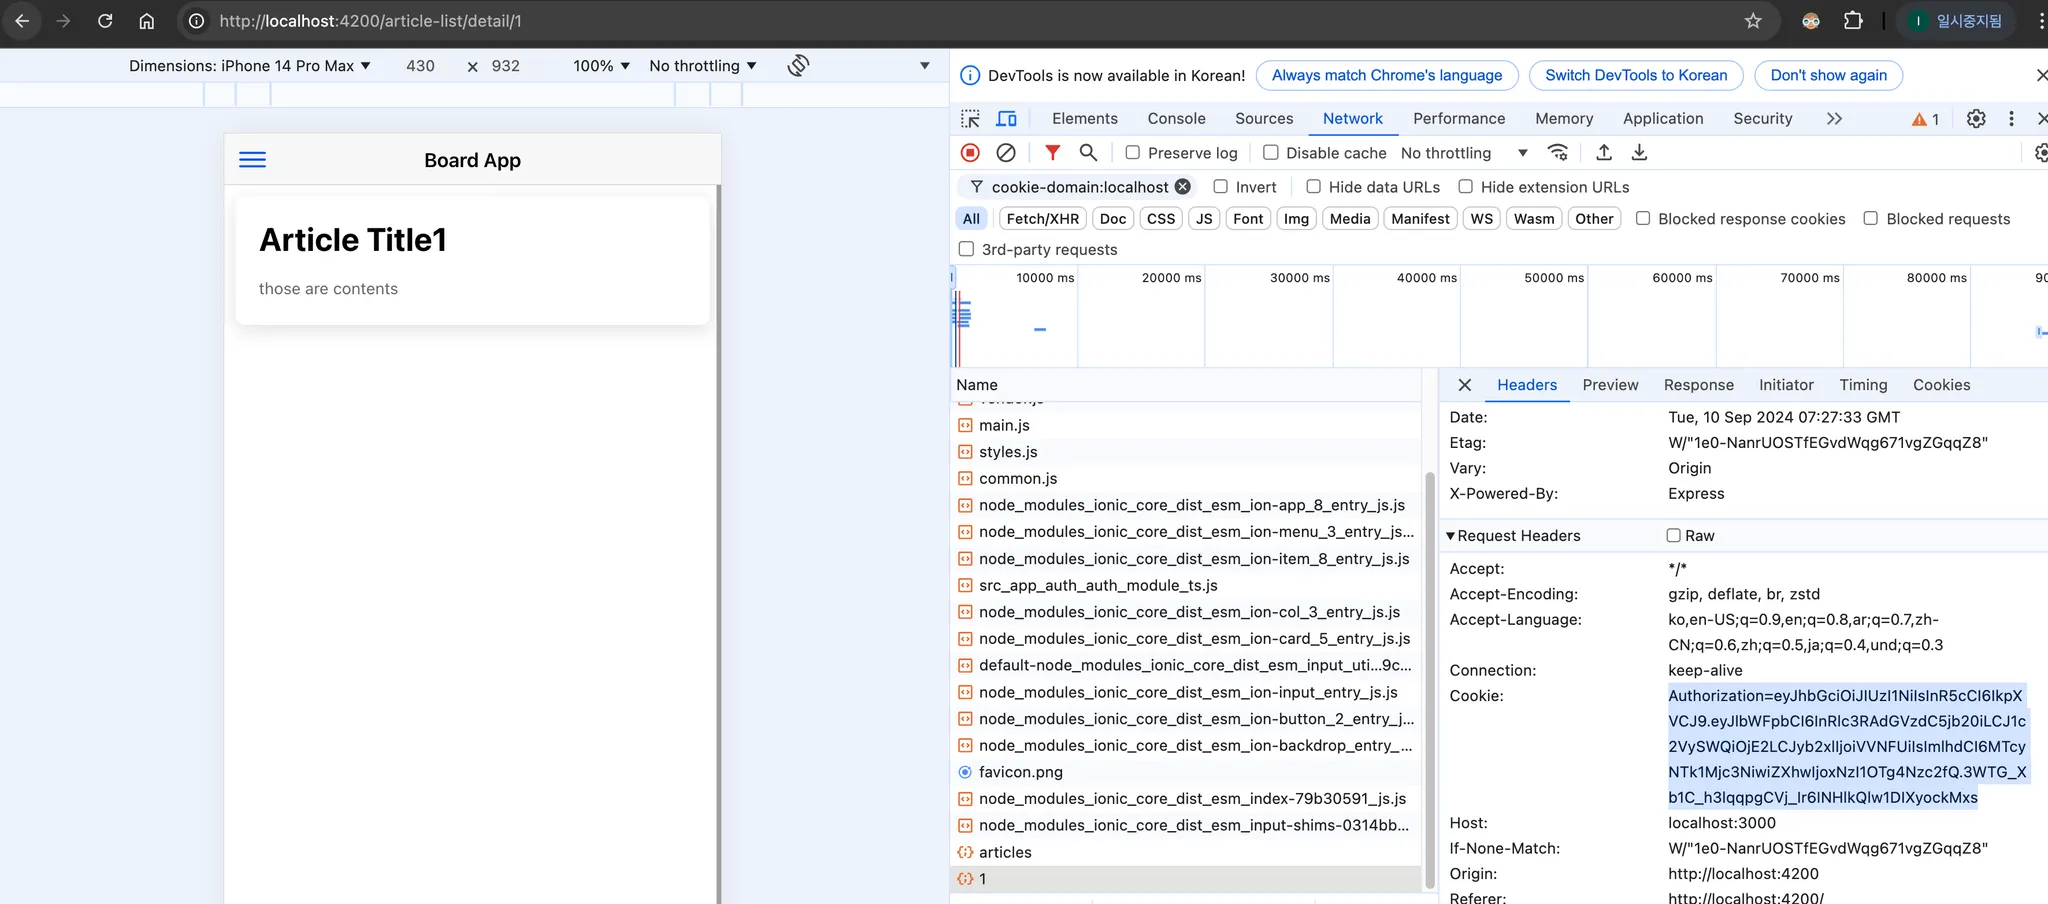
특정 게시글 조회 요청, Request Header에 JWT 토큰이 함께 전송 된 모습
◦
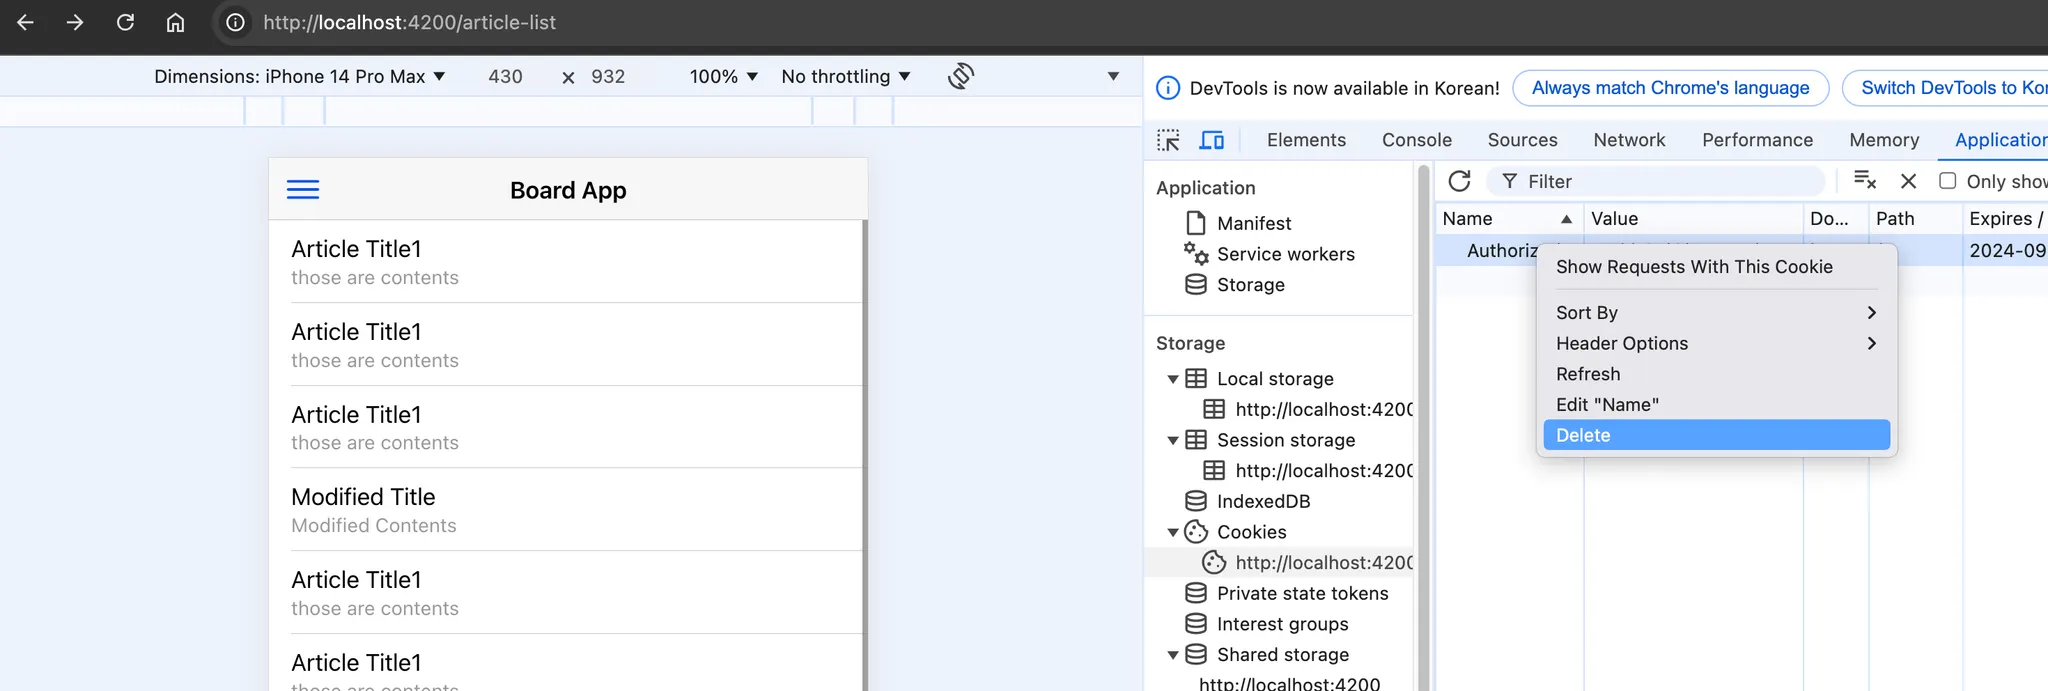
JWT 토큰 강제 삭제 후 재요청으로 권한 제어 상태 재확인
6. Fetch API에서 HttpClient API로 리팩토링 및 컨벤션 통일
6.1 HttpClient API 리팩토링
HttpClient의 강점
HttpClient는 Angular에서 제공하는 강력한 HTTP 요청 서비스이다. 이를 통해 API 통신을 보다 효율적으로 처리 할 수 있다.
•
자동 JSON 변환
◦
HttpClient는 자동으로 요청과 응답 데이터를 JSON으로 변환하므로, 별도의 JSON.stringify나 JSON.parse를 사용할 필요가 없다.
•
인터셉터(Interceptors)
◦
요청 또는 응답 전에 미리 로직을 추가할 수 있어, JWT 토큰을 헤더에 자동으로 추가하거나, 에러를 처리하는 로직 구성 가능
•
타입 안정성
◦
HttpClient는 타입스크립트와 잘 통합되어 있어서, 응답 데이터를 제네릭으로 정의하고 타입 안전성 유지
•
옵저버블(Observable) 지원
◦
Angular의 HttpClient는 RxJS 옵저버블을 지원하여, 스트리밍 데이터를 처리하거나 비동기 로직을 더 유연하게 사용 가능
app.module.ts
•
HttpClient를 사용하기 위해서는 HttpClientModule 을 주입 받아야 한다.
import { NgModule } from '@angular/core';
import { BrowserModule } from '@angular/platform-browser';
import { RouteReuseStrategy, RouterModule } from '@angular/router';
import { IonicModule, IonicRouteStrategy } from '@ionic/angular';
import { AppComponent } from './app.component';
import { AppRoutingModule } from './app-routing.module';
import { HttpClientModule } from '@angular/common/http';
@NgModule({
declarations: [AppComponent],
imports: [
RouterModule,
BrowserModule,
IonicModule.forRoot(),
AppRoutingModule,
HttpClientModule,
],
providers: [{ provide: RouteReuseStrategy, useClass: IonicRouteStrategy }],
bootstrap: [AppComponent],
})
export class AppModule {}
TypeScript
복사
6.1.1 로그인 및 회원가입 부분
auth.service.ts
•
기본 자바스크립트 Fetch API보다 상당량 코드가 줄어 든 것을 볼 수 있다.
•
생성자 주입을 통해 HttpClient를 주입받아서 사용해야 한다.
◦
HttpClient는 post(), get(), put(), delete() 등 메서드를 제공하기 떄문에 손쉽게 요청을 작성 할 수 있다.
◦
withCredentials: true 를 통해서 인증 관련 정보(주로 쿠키)를 포함시킬 수 있다.
◦
HttpHeaders()를 통해서 요청의 메타데이터인 헤더의 속성을 작성 할 수 있다.
•
Observable은 RxJS (Reactive Extensions for JavaScript) 라이브러리에서 제공하는 데이터 스트림 객체
◦
HttpClient는 HTTP 요청의 응답을 Observable로 반환하여 비동기적으로 서버와 통신하며, 응답 데이터를 쉽게 처리하게 해준다.
◦
이 Observable을 구독(subscribe)하여 데이터를 처리 → Component에서 자세히 설명
import { Injectable } from '@angular/core';
import { HttpClient, HttpHeaders } from '@angular/common/http';
import { Observable } from 'rxjs';
import { SignInRequestData } from '../models/auth/auth-signin-request-data.interface';
import { SignUpRequestData } from '../models/auth/auth-signup-request-data.interface';
import { AuthResponse } from '../models/auth/auth-response.interface';
@Injectable({
providedIn: 'root'
})
export class AuthService {
private apiUrl = 'http://localhost:3000/api/auth';
constructor(private http: HttpClient) { }
signUp(signUpRequestData: SignUpRequestData): Observable<AuthResponse> {
const headers = new HttpHeaders({ 'Content-Type': 'application/json' });
return this.http.post<AuthResponse>(`${this.apiUrl}/signup`, signUpRequestData, { headers });
}
signIn(signInRequestData: SignInRequestData): Observable<AuthResponse> {
const token = localStorage.getItem('jwtToken'); // 로컬스토리지에서 JWT 토큰 가져오기
const headers = new HttpHeaders({
'Content-Type': 'application/json',
'Authorization': token ? token : '' // JWT 토큰을 헤더에 포함
});
return this.http.post<AuthResponse>(`${this.apiUrl}/signin`, signInRequestData, { headers });
// 쿠키를 사용하는 경우, withCredentials를 true로 설정하여 요청에 쿠키를 포함
// return this.http.post<AuthResponse>(`${this.apiUrl}/signin`, signInRequestData, { headers, withCredentials: true });
}
}
TypeScript
복사
signup.component.ts
•
signUp 메서드는 위 AuthService에서 정의된 HTTP POST 요청 메서드이다.
•
Observable<AuthResponse>를 반환
◦
subscribe는 Observable의 데이터를 수신하기 위해 사용하는 메서드
▪
subscribe는 세 개의 콜백 함수를 인자로 받을 수 있다. next, error, complete
•
next 콜백
◦
next는 Observable이 발행하는 데이터를 처리하는 함수
◦
HTTP 요청의 성공적인 응답을 받았을 때 호출
•
error 콜백
◦
error는 데이터 스트림에서 에러가 발생했을 때 호출
◦
네트워크 오류나 서버 오류 등이 발생했을 때 처리
•
complete 콜백
◦
데이터 스트림이 종료되었음을 나타내며, 이후 더 이상 데이터가 발행되지 않음
◦
예를 들어, HTTP 요청이 완료된 후 추가 데이터가 없을 때 호출
◦
데이터 스트림이 종료된 상태를 명시적으로 알 수 있음
그 외 Observable은 여러 기능을 제공한다
import { Component } from '@angular/core';
import { AuthService } from '../auth.service';
import { UserRole } from '../../models/common/user-role.enum';
import { Router } from '@angular/router';
import { SignUpRequestData } from 'src/app/models/auth/auth-signup-request-data.interface';
@Component({
selector: 'app-signup',
templateUrl: './signup.component.html',
styleUrls: ['./signup.component.scss'],
})
export class SignUpComponent {
username: string = '';
password: string = '';
passwordConfirm: string = '';
email: string = '';
role: UserRole = UserRole.USER;
postalCode: string = '';
address: string = '';
detailAddress: string = '';
constructor(private authService: AuthService, private router: Router) {}
onSignUp() {
if (this.password !== this.passwordConfirm) {
console.error('Passwords do not match');
return;
}
const signUpRequestData: SignUpRequestData = {
username: this.username,
password: this.password,
email: this.email,
role: this.role,
postalCode: this.postalCode,
address: this.address,
detailAddress: this.detailAddress,
};
this.authService.signUp(signUpRequestData).subscribe({
next: response => {
if (response.success) {
console.log('Sign Up successful:', response.data);
this.router.navigate(['auth']);
} else {
console.error('Sign Up failed:', response.message);
}
},
error: err => {
console.error('Sign Up error:', err);
},
complete: () => {
console.log('Sign Up request completed.');
}
});
}
}
TypeScript
복사
signin.component.ts
•
회원가입과 동일하게 HttpClient를 사용하는 코드로 리팩토링되었다.
import { Component } from '@angular/core';
import { AuthService } from '../auth.service';
import { Router } from '@angular/router';
import { SignInRequestData } from 'src/app/models/auth/auth-signin-request-data.interface';
@Component({
selector: 'app-signin',
templateUrl: './signin.component.html',
styleUrls: ['./signin.component.scss'],
})
export class SignInComponent {
email: string = '';
password: string = '';
constructor(private authService: AuthService, private router: Router) {}
onSignIn() {
const signInRequestData: SignInRequestData = {
email: this.email,
password: this.password,
};
this.authService.signIn(signInRequestData).subscribe({
next: response => {
if (response.success) {
this.router.navigate(['/']);
} else {
console.error('Sign In failed:', response.message);
}
},
error: err => {
console.error('Sign In error:', err);
},
complete: () => {
console.log('Sign In request completed.');
}
});
}
}
TypeScript
복사
6.1.2 게시글 부분
article.service.ts
•
회원가입 로그인 서비스와 동일하게 HttpClient를 생성자 주입 받아서 사용하도록 리팩토링 되었다.
import { Injectable } from '@angular/core';
import { HttpClient, HttpHeaders } from '@angular/common/http';
import { Observable } from 'rxjs';
import { ApiResponse } from '../models/common/api-response.interface';
import { ArticleResponseData } from '../models/article/article-response-data.interface';
@Injectable({
providedIn: 'root'
})
export class ArticleService {
private apiUrl = 'http://localhost:3000/api/articles';
constructor(private http: HttpClient) { }
getAllArticles(): Observable<ApiResponse<ArticleResponseData[]>> {
const token = localStorage.getItem('jwtToken'); // 로컬스토리지에서 JWT 토큰 가져오기
const headers = new HttpHeaders({
'Content-Type': 'application/json',
'Authorization': token ? token : '' // JWT 토큰을 헤더에 포함
});
return this.http.get<ApiResponse<ArticleResponseData[]>>(`${this.apiUrl}/articles`, { headers });
// 쿠키를 사용하는 경우, withCredentials를 true로 설정하여 요청에 쿠키를 포함
// return this.http.get<ApiResponse<ArticleResponseData[]>>(`${this.apiUrl}/articles`, { headers, withCredentials: true });
}
getArticleById(id: number): Observable<ApiResponse<ArticleResponseData>> {
const token = localStorage.getItem('jwtToken'); // 로컬스토리지에서 JWT 토큰 가져오기
const headers = new HttpHeaders({
'Content-Type': 'application/json',
'Authorization': token ? token : '' // JWT 토큰을 헤더에 포함
});
return this.http.get<ApiResponse<ArticleResponseData>>(`${this.apiUrl}/articles/${id}`, { headers });
// 쿠키를 사용하는 경우, withCredentials를 true로 설정하여 요청에 쿠키를 포함
// return this.http.get<ApiResponse<ArticleResponseData>>(`${this.apiUrl}/articles/${id}`, { headers, withCredentials: true });
}
}
TypeScript
복사
articles-list.component.ts
•
게시글 서비스에 맞추어 게시글 전체 조회 부분이 subscribe로 구성되었다.
import { Component, OnInit } from '@angular/core';
import { Article } from 'src/app/models/articles/article-response.interface';
import { Router } from '@angular/router';
import { ArticlesService } from 'src/app/services/articles.service';
@Component({
selector: 'app-articles-list',
templateUrl: './articles-list.component.html',
styleUrls: ['./articles-list.component.scss'],
standalone: false
})
export class ArticlesListComponent implements OnInit {
articles: Article[] = [];
constructor(
private articlesService: ArticlesService,
private router: Router,
) { }
ngOnInit() {
this.articlesService.getAllArticles().subscribe({
next: response => {
if (response.success) {
this.articles = response.data;
} else {
console.error(response.message);
}
},
error: err => {
console.error('Error fetching articles:', err);
},
complete: () => {
console.log('Fetching articles request completed.');
}
});
}
// route Article detail page
viewArticle(id: number) {
this.router.navigate([`detail/${id}`]);
}
}
TypeScript
복사
article-detail.component.ts
•
게시글 서비스에 맞추어 특정 게시글 조회 부분이 subscribe로 구성되었다.
import { Injectable } from '@angular/core';
import { HttpClient, HttpHeaders } from '@angular/common/http';
import { Observable } from 'rxjs';
import { ApiResponse } from '../models/common/api-response.interface';
import { ArticleResponseData } from '../models/article/article-response-data.interface';
@Injectable({
providedIn: 'root'
})
export class ArticleService {
private apiUrl = 'http://localhost:3000/api'; // 실제 API URL로 변경
constructor(private http: HttpClient) { }
getAllArticles(): Observable<ApiResponse<ArticleResponseData[]>> {
const headers = new HttpHeaders({ 'Content-Type': 'application/json' });
return this.http.get<ApiResponse<ArticleResponseData[]>>(`${this.apiUrl}/articles`, { headers, withCredentials: true });
}
getArticleById(id: number): Observable<ApiResponse<ArticleResponseData>> {
const headers = new HttpHeaders({ 'Content-Type': 'application/json' });
return this.http.get<ApiResponse<ArticleResponseData>>(`${this.apiUrl}/articles/${id}`, { headers, withCredentials: true });
}
}
TypeScript
복사
6.2 컨벤션 통일
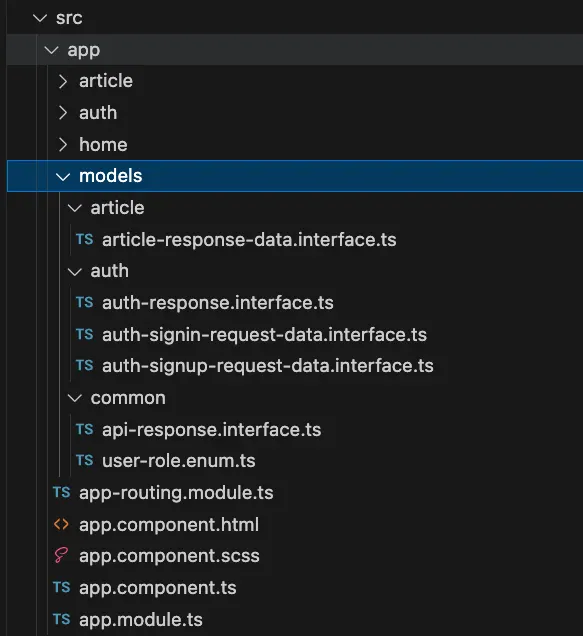
일부 통일성을 지키기 위해 전체적인 구조가 변경되었다.
•
소스코드 내 interface들을 파일로 분리하고 models라는 폴더로 이동하였다.
◦
각 리소스별 폴더로 구분하고 Response, Request 키워드로 정확한 사용처를 알 수 있도록 구분했다.
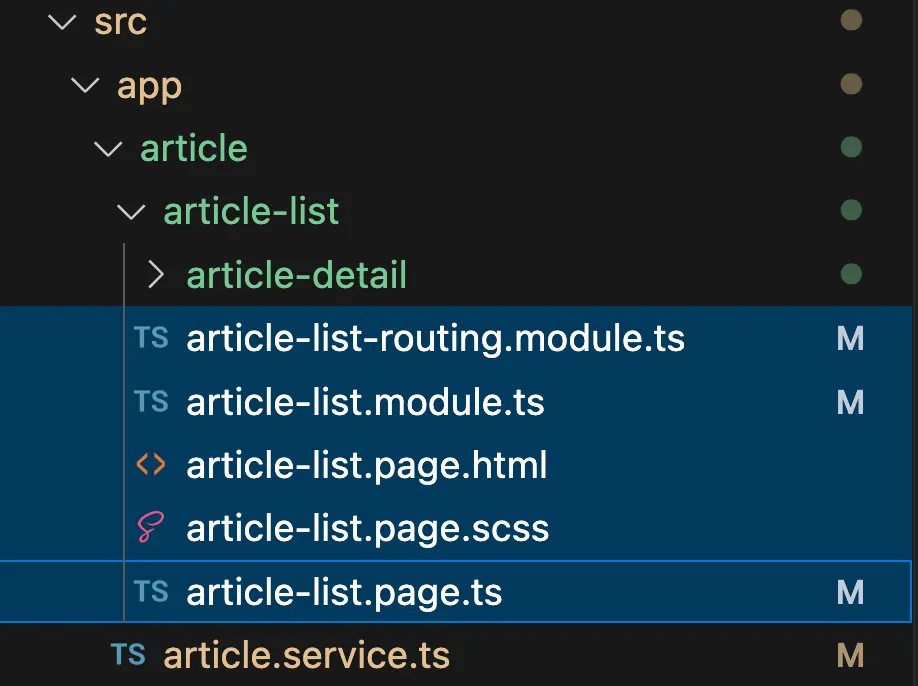
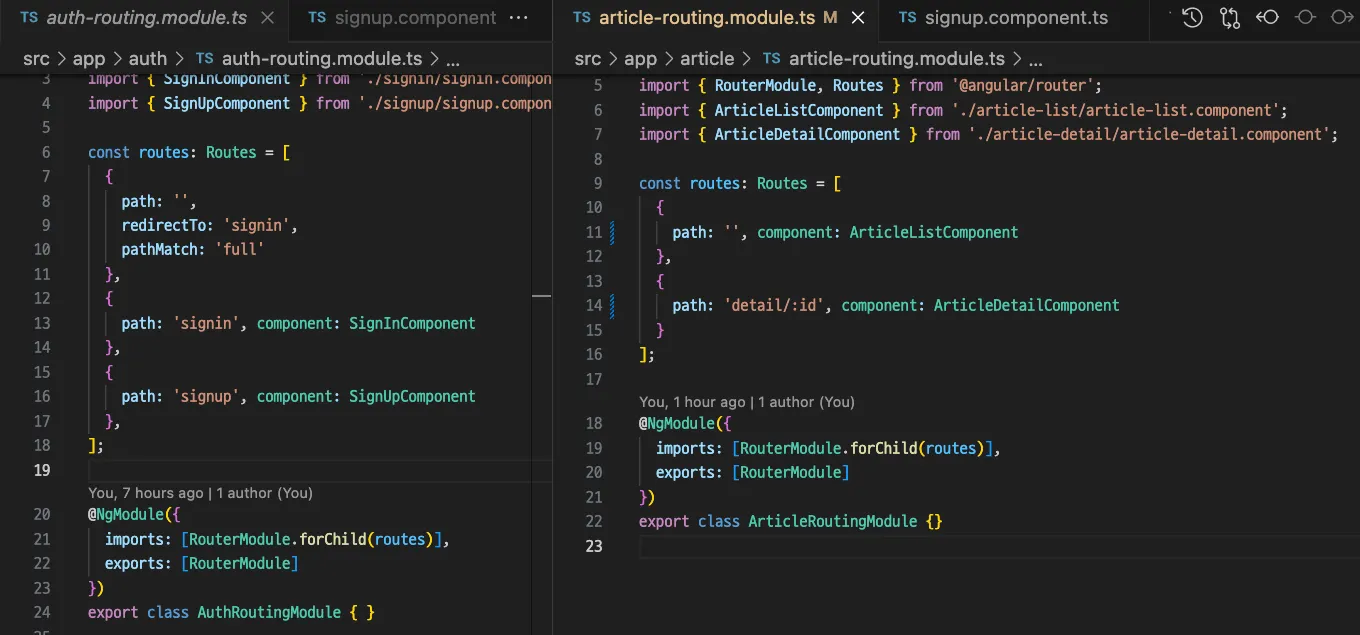
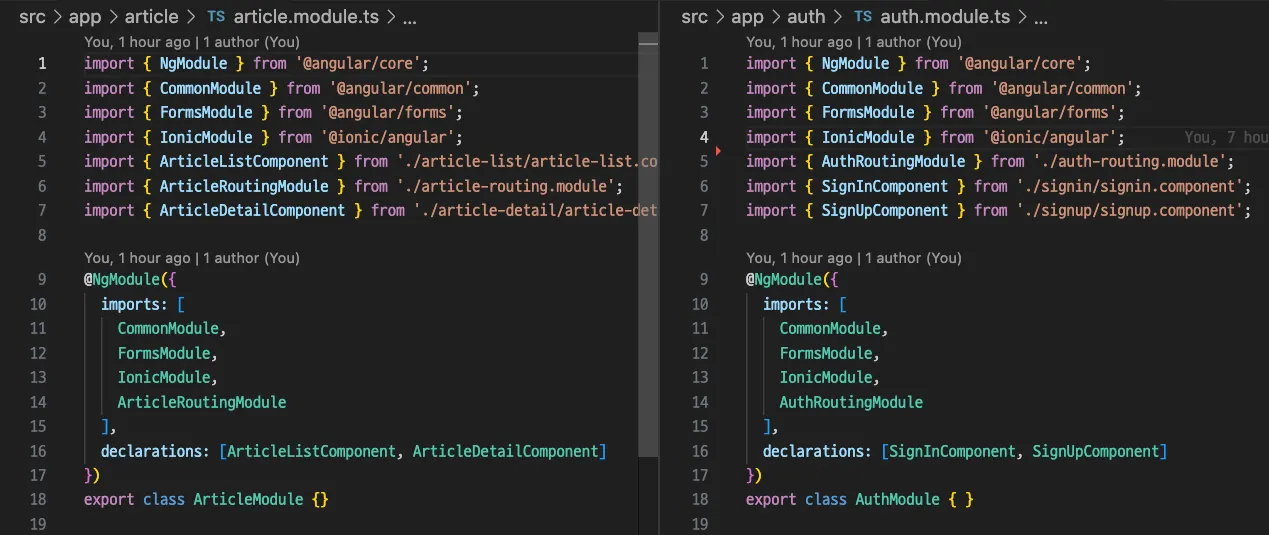
auth를 기준으로 article의 폴더 구조 및 모듈, 라우팅 의존 관계 정리
•
리소스폴더 / 세부페이지 관계로 폴더 계층 구조를 명확하게 통일 시켰다.
•
각 리소스 라우터는 동일한 양식으로 세부페이지들을 관리하도록 코드를 통일했다.
•
app-routing.module.ts 에서 위 리소스 라우터들의 메인을 관리하도록 정리했다. 기능이 추가 될 때마다 이곳부터 하나씩 계단식으로 추가된다.
import { NgModule } from '@angular/core';
import { RouterModule, Routes } from '@angular/router';
import { HomeModule } from './home/home.module';
const routes: Routes = [
{
path: '', component: HomeModule
},
{
path: 'articles',
loadChildren: () => import('./articles/articles.module').then(m => m.ArticlesModule)
},
{
path: 'auth',
loadChildren: () => import('./auth/auth.module').then(m => m.AuthModule)
},
// 하나씩 추가 될 부분
];
@NgModule({
imports: [RouterModule.forRoot(routes)],
exports: [RouterModule]
})
export class AppRoutingModule {}
TypeScript
복사
•
각 리소스 모듈 또한 동일한 양식으로 라우팅 모듈을 관리한다.
•
app.module.ts 루트 모듈에서 AppRoutingModule을 주입받으면서 세부 컴포넌트 모듈들이 주입된다.
import { NgModule } from '@angular/core';
import { BrowserModule } from '@angular/platform-browser';
import { RouteReuseStrategy, RouterModule } from '@angular/router';
import { IonicModule, IonicRouteStrategy } from '@ionic/angular';
import { AppComponent } from './app.component';
import { AppRoutingModule } from './app-routing.module';
import { HttpClientModule } from '@angular/common/http';
@NgModule({
declarations: [AppComponent],
imports: [
RouterModule,
BrowserModule,
IonicModule.forRoot(),
AppRoutingModule,
HttpClientModule,
],
providers: [{ provide: RouteReuseStrategy, useClass: IonicRouteStrategy }],
bootstrap: [AppComponent],
})
export class AppModule {}
TypeScript
복사
PS. Github
•
리팩토링 완료 된 결과 코드 묶음은 Github를 참고
•
Backend
•
Related Posts
Search

