NestJS, TypeORM, Angular 이해하기
Table of Content
1. 프론트엔드 Slide 기능 구현
1. Swiper.js 설치
슬라이드 효과 구현을 위한 Swiper 설치
•
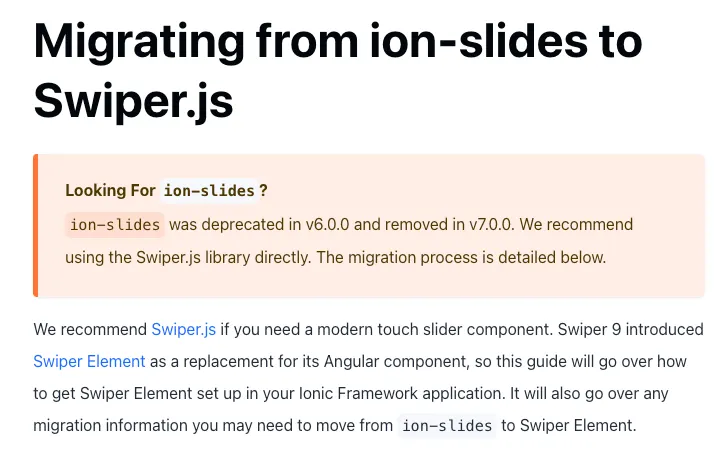
IONIC 에서는 7버전 이후로 ion-slides 라는 태그의 기능이 제거되었다.
•
공식 문서에서도 슬라이드 기능을 위해서는 Swiper.js 를 활용하여 추가 할 것을 안내해주고 있다.
•
아래 명령어를 통해 프로젝트에 swiper를 설치한다.
npm i swiper
Shell
복사
2. Swiper 설정
home.module.ts
•
slide 기능을 구현 할 리소스 모듈에 해당 설정을 추가해주어야 한다.
◦
이 프로젝트에서는 메인화면(home)에서 슬라이드 기능을 추가하기 위하여 home.module.ts 에서 설정을 추가했다.
import { NgModule } from '@angular/core';
import { CommonModule } from '@angular/common';
import { IonicModule } from '@ionic/angular';
import { FormsModule } from '@angular/forms';
import { HomeComponent } from './home.component';
import { HomeRoutingModule } from './home-routing.module';
import { CUSTOM_ELEMENTS_SCHEMA } from '@angular/core';
@NgModule({
imports: [
CommonModule,
FormsModule,
IonicModule,
HomeRoutingModule
],
declarations: [HomeComponent],
schemas: [CUSTOM_ELEMENTS_SCHEMA]
})
export class HomeModule {}
TypeScript
복사
app.module.ts
•
Swiper의 함수를 호출하여 registerSwiper의 사용자 정의 요소를 전역적으로 등록해야 한다.
import { Component } from '@angular/core';
import { register } from 'swiper/element/bundle';
register();
@Component({
selector: 'app-root',
templateUrl: 'app.component.html',
styleUrls: ['app.component.scss'],
})
export class AppComponent {
constructor() {}
}
TypeScript
복사
3. Slide 기능 정의
home.component.ts
•
slide 기능을 사용할 컴포넌트에서 기능의 세부 사항을 정의해줘야 한다.
◦
컴포넌트 클래스는 AfterViewInit 을 상속받아서 통해서 뷰 초기화 이후에 슬라이드 기능들이 로드되도록 한다.
import { Component, AfterViewInit, ViewChild, ElementRef } from '@angular/core';
@Component({
selector: 'app-home',
templateUrl: 'home.component.html',
styleUrls: ['home.component.scss'],
})
export class HomeComponent implements AfterViewInit {
@ViewChild('swiper') swiperRef!: ElementRef;
constructor() {}
ngAfterViewInit() {
const swiperEl = this.swiperRef.nativeElement;
const params = {
slidesPerView: 1,
};
Object.assign(swiperEl, params);
swiperEl.initialize();
}
}
TypeScript
복사
4. Slide 태그 사용
home.component.html
•
body 내 swiper-slide 태그 사용 예시
<ion-header>
<ion-toolbar>
<ion-title>
Home
</ion-title>
</ion-toolbar>
</ion-header>
<ion-content>
<ion-card>
<ion-card-header>
<ion-card-title>Welcome to the Board App Page</ion-card-title>
</ion-card-header>
<ion-card-content>
This is the main page of the application. Not Ready to use yet. 🛠️
</ion-card-content>
</ion-card>
<swiper-container #swiper>
<swiper-slide><img src="https://img.cgv.co.kr/Movie/Thumbnail/Poster/000088/88488/88488_320.jpg"></swiper-slide>
<swiper-slide><img src="https://img.cgv.co.kr/Movie/Thumbnail/Poster/000088/88531/88531_320.jpg"></swiper-slide>
<swiper-slide><img src="https://img.cgv.co.kr/Movie/Thumbnail/Poster/000088/88500/88500_320.jpg"></swiper-slide>
</swiper-container>
</ion-content>
TypeScript
복사
5. 테스트
화면 테스트
•
PS. Github
•
리팩토링 완료 된 결과 코드 묶음은 Github를 참고
•
Backend
•
Frontend
Related Posts
Search
.jpg)


